Sunday, December 27, 2015

December's Fallow Fields

This is a pretty good visual analogy, actually.
It would appear I was more burned out than I thought, a condition which was not assisted by work suddenly going from zero to All The Stress Ever.  I haven't been able to do a blessed thing except knit since Colossus: The 19th Century Project was complete, and even that hasn't been constant.  On the bright side, the first sock is done, and I'm maybe a sixth of the way into the 2nd sock (it should have been further, but I didn't get as much done on my travels as I hoped).  I also took a swift detour to start knitting up [REDACTED] for [REDACTED]'s Giftmas, and I'm mildly smug that it's going both swiftly and competently considering it's something I haven't done before.

I'm still feeling uninspired as regards sewing.  There's one project I'd like to do for [REDACTED]'s Giftmas, which I don't think should be difficult but I do have to think it through, and the thinking is the problem.  At the same time, I am feeling the hot breath of You Should Get Some Recreation Stuff Going on the back of my neck; there will be an Arts & Sciences display next month and I really ought to have something to present; I should be doing; I should be advancing my skills and showing this to the world; but my tank of fucks appears to have the needle stuck at "E".  --Interestingly, I was feeling more motivated the week before Christmas.  I wonder how much of this is holiday exhaustion made 100x worse by the wretched cold I've had for the past week.   It is admittedly hard to feel energized and creative when you are horking up lung every time you take a deep breath.

I am trying to combat my general malaise by focusing on small goals, little wins.  I'll concentrate on finishing [REDACTED] and [REDACTED].  I'll nibble away on the 2nd sock while stuck on the couch with lurgy.  I will do the last 10% of work on the furshlugginer or nué pouch so it can be DONE DONE DONE (even if it is wrong wrong wrong).   And then, I'll see where my brain is at.

Tuesday, November 10, 2015

Knitting And Unexpected Psychological Whuts

Currently knitting: Three Irish Girls' "Keep On Walking In The Free World",
main yarn colorway "Harvest Moon", secondary yarn colorway "Heart of Gold"
Edited to add: this is not yet what my sock looks like

I had previously expressed my intention to do nothing more complicated than sock knitting for the month of November, but I am already feeling the faint stirrings of You Should Really Be Doing Something Real.  This is an interesting peek into the murky depths of my subconscious, because what, pray tell, isn't real about having a pair of colorful warm wool socks for when winter finally decides to show up?  

Apparently, there is that within me which does not countenance the making of objects unless they are a) historical re-creations or b) for someone else.  


So I figure as how I have a few issues to work through right there.   While that's processing, I'm going to double down on my intention to finish these socks first, and not permit myself to go chase some other shiny.  I'm not a great judge of my knitting production speed yet, but I think I should be able to finish them before the month is out (kneesocks though they are).

Once that's done, or at least once I have a comfortable enough rhythm established that I'm OK with alternating work, there comes the dicey task of choosing what to do next.

  • I have a big ol' list of mending for our medieval* clothes.
  • I have a similarly big ol' list of medieval clothes projects I'd like to begin.
  • I have yet another big ol' list of medieval household goods I wanted to make.
  • And I have a big ol' Ravelry queue of knitting projects.
  • Then there's the embroidery project ideas.
  • Oh, and one of my avoidance moments while working on The 19th Century Project was that I suddenly had some inspirations for making modern clothes.
I need to find a way to prioritize my initiatives, and be OK with that prioritization, or I'm going to end up chasing my tail and/or in a meeping pile under the blankets.

* disclaimer: any use of "medieval" in this blog can, unless specified otherwise, be assumed to include any of that weird-ass science fiction stuff that happens after Anno Domini 1410.

Friday, November 6, 2015

19th Century Project: Mission Accomplished

Current mood:
Well, thank goodness that's over.

Last check-in was a gibbering brain-dump two days before the wedding, I believe?  So, in those two days, I managed to get all the critical requirements done, except:
  • No additional braid made it onto the uniform, alas.
  • My skirt was not hemmed.  Well, it sort of was, in that I attached a wide strip of ciré to the bottom of the skirt and turned it in, thus creating a hem; but having no one to hand until Saturday to actually mark the hem, on that day we found that it was way too long, so I ended up having to pin the whole thing up for the wedding.  Which, of course, started coming down over the course of the evening. But it sufficed.
  • I didn't put closures on the skirt waistband or slit.  God Bless Safety Pins.
Bugs and issues:
  • On my outfit:
    • The 1/4" historically accurate twill tape I used as my corset lacing broke when Beth was lacing me in.  ("Tighter, Mammy, tighter!")  Like the Duke of Wellington, we tied a knot and carried on; but that combined with the fact that we were already super-late and did not have time for adjustments meant that my shape was doing kinda weird things.
    • Possibly related to the above point: the bodice was riding a little higher than it should have, I think.  Also, the pointed front was occasionally drifting to one side.
    • The stuff I chose to lace the bodice was also inadequate for purpose, but at least it didn't break.
    • The sleeves on the chemise ended up being longer than the sleeves of the gown; and even after we rolled them up and pinned them (God Bless Safety Pins, again) they were slightly visible because the pleating plus the stiffness of the silk gave a sort of funnel visibility effect when I raised my arms.  I think I just have to remove them entirely.  WELL THAT WAS THREE HOURS OF MY LIFE WASTED.
    • The skirt waistband was, cough, a little small.  I think that if we'd been able to lace me up fully it would've been OK, though.
  • On my consort's outfit:
    • Somehow the center back piece of the coat ended up being a good 2" shorter than the rest of the back hem-line.  I kludged this by just sewing in another strip of fabric to make up the difference.
    • The trousers were way too short!  I realized that this was kind of Not Wrong, because you'd expect to be wearing tall boots and possibly gaiters as well, but this did not help us because he had neither.  I kludged this the same way--sewed in a strip of fabric at the bottom of each leg.
    • The collar is a leeetle tall and the cuffs definitely a bit too long.  (The cuffs will be easy to fix, the collar less so.)
    • As I think I mentioned earlier, some things went a little off the rails when calculating the shape and angle of the trouser fall, so it comes up higher and further out than it should, which skews the fit slightly in other ways.  I don't think most people would realize this, but it bugs me.
    • I should have moved the trouser side points back about a half inch on each side, so the slit at the back isn't forced open so wide.  Again, this is not wrong per se (this is why there is a slit and lacing at the back) but it makes it a less elegant fit.
All in all, however, I'm really quite pleased with our turnout.  As well, the whole project has been a major confidence booster for me; the fact that, from a cold start, I managed to create pieces that were this passable (and on a ridiculous schedule) is a pretty remarkable level-up for me. 

What's that?  You want pictures?  Oh, very well:

Going down the dance (photo by
Serena Star Photography)
My dashing escort and my bestie.
(His jacket does button fully
and comfortably, but it was
late and hot)

Afterwards; you see my hem has
entirely given up the ghost

Thursday, October 29, 2015

Blogging? Ain't Nobody Got Time For That

Suffice to say that I've been working my tail off, in spite of ridiculous setbacks (self-inflicted and otherwise) (really, sewing machine belt?  This is a good time to break?).  With 48 hours to go, the tasks remaining are:

  • For gown:
    • Baste decorative bias strips to the bodice (see picture below) (this is called a "bertha", don't ask me why)
    • Sew sleeves into bodice
    • Cartridge-pleat skirt (who has two thumbs and a case of severe avoidance?  THAT'S RIGHT)
    • Sew skirt to waistband
    • Put hook-and-eye (or something) to fasten waistband
    • Make eyelets on the right half of bodice center back
    • Hem the skirt, or else line the bottom foot or so with appropriate stiffened fabric
  • For uniform:
    • Make up tiny mind where the coatee hem will be, and cut & sew it closed
    • Add two rows of decorative button to front
    • Add decorative braid in back
    • Shorten cuffs slightly
    • Add a metric fuckton of decorative braid to front.  (This is probably not going to happen, alas, because it is an all-or-nothing job.)
    • Fringe the ends of the sash (which task is being delegated to our passenger on the drive up, ahem)

I'd also like to find some lace elbow gloves but the Town Shop failed me and I don't have time to fuck around hunting through bridal stores, so.

The main decision tree right now is, what tasks have to be/are more easily done at home; which could be done in the car (NB: I invariably get carsick if I try to sew in the car), and which could be done in the ~24 hours between arriving at the wedding location and the actual wedding...


Uniform coatee, constructed (but not yet
ornamented or en-buttoned).

The bodice, functionally complete, with
decorative bias strips laid out


Wednesday, October 21, 2015

Is That A Milestone Whooshing By, Or A Deadline?

Gentlemen, behold!  PANTS!
Well, both, really.

I completed one milestone this week--the trousers are finished!  (The photo is from Monday, when the construction was completed; last night I did the finish-y bits--hemming, attaching the suspenders, etc.)  Of course I only see the errors and the places where I didn't quite Get It, but the customer reports that they are comfortable and trouser-like.  I shall count that as "essential requirements met".

However, looking at Ye Project Plan, I find that there were a whole bunch of tasks I should have completed by now, and I'm feeling a little hinky about it.  The good news is, this weekend I shall have the advantage of tapping some sweatshop help, but I need to get enough done beforehand so that there's work that I can farm out.   I'm at the point of praying that the fridge repair guy will come tomorrow or Friday so I'll be forced to take a personal day. 

Anyone got a scarlet sash
I can borrow, while we're
at it?  I AM NOT LEARNING
$*@& SPRANG FOR THIS
Tonight's task is to cut out & assemble the muslin of the dress bodice, which I will take out to Kasia, Princess of Draping, tomorrow night for a fit check (I know dam' well it'll have to be shortened, at the very least) and confirm the bone lengths I need for it.  Yes, the dress is boned even though it's worn over a boned corset; those wacky Victorians, man.  I'd also like to get the uniform coat pieces cut out so I can have more portability for the weekend's work. 

Again, the actual construction of the coat and the dress both aren't particularly complicated, as these things go (the more so since I spent a little time redacting & simplifying the coat pattern--it is very meticulous in its historical accuracy but ain't no one got time for that now and by Crom we will machine-work the shit out of this).  It's more that there are some tasks which are inflexibly slow, like 22 buttonholes on the coat, or 144" of cartridge pleating on the skirt.  (And the less said about the uniform trim, the better *sob*.)  If I can apply Mongolian Hordes Technique to those portions, I'll be in good position to do the rest of the work over the upcoming week.

Still gonna be some late nights, though.

Thursday, October 15, 2015

Time Passes And Progress Is Made


Half a loaf?
Dear Internet, it has been 10 days since my last confession, etc.  I was away and resolutely Not Sewing from Friday through Monday afternoon, which was perhaps imprudent as to time use but good for the soul; but I did not sit idle the rest of the time. Thursday, Monday, and Tuesday evenings I advanced the corset a good ways, and the left half of it, as you see above, is complete.  (It is better practice, I believe, to do each step to both sides before proceeding to the next step; but when I had reached the bone placement, I just wanted to get one part done both for confirmation that it would come out right, and as a morale booster.)  I won a little time by finding some bias tape in my stash of a color I thought appropriate and agreeable--that's the pale blue edging you see in the photo--so didn't have to faff about cutting and forming bias bindings out of fabric.  If I have infinite time, HAR HAR, I would put the same lace from the chemise along the top, and perhaps thread a pale blue ribbon through, or do pale blue flossing along the boning channels.  

All in all I'm reasonably pleased with it so far.  There are wrinkles and unevenness--my machine sewing has greatly improved, but is still not precision, so there are spots where the fashion fabric piece was slightly larger than the lining it's supposed to match.  But, as a first effort, it is acceptable.

Last night I set the corset aside to attack my ancient enemy, the uniform trousers.  I had cut out all the fabric pieces when I got home on Monday, when there was still daylight, so I could dive in at any moment; this is a good strategy and I will do more of it in future.  So, I was well positioned to begin, and the first steps went slowly (it's all hand-sewing) but tolerably well.  Then my frail barque of confidence became dashed on the rocks of the fall binders.  What is a fall binder, you ask?

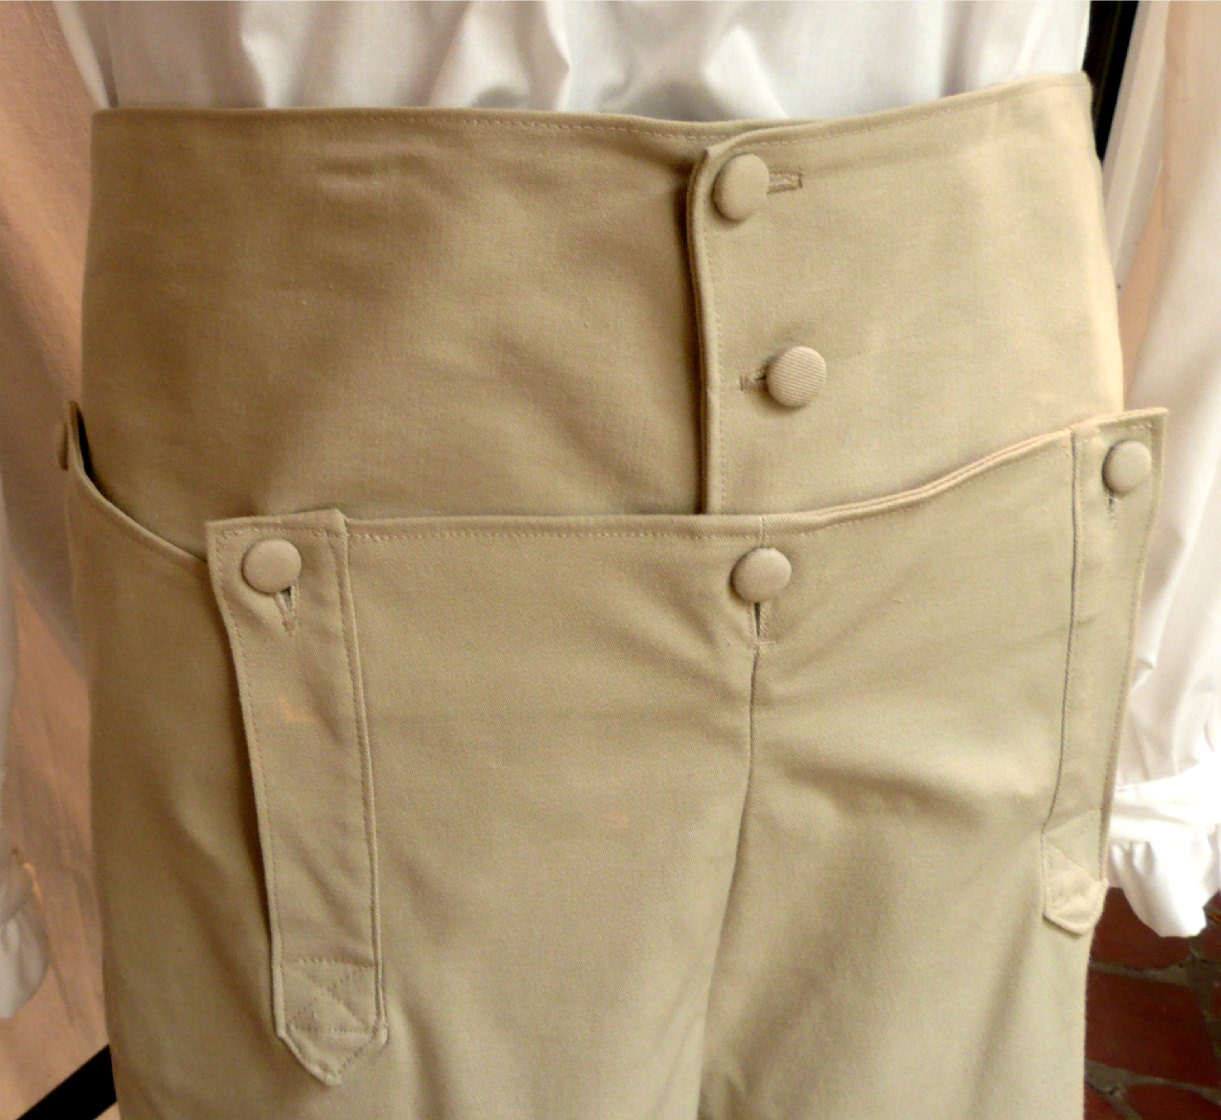
So.  Here's a pair of Regency pantses, opened up for your delectation:


The "fall" is that flap that's come down at the front, so that sir can take a wee without actually dropping his drawers.  The "fall bearers" are the matching, somewhat trapezoidal bits (in two parts, left and right), with two buttons, that, if the fall was raised up, would be completely covered by it.  And the "fall binders" are not terribly visible in the photo but they are what binds (see?) the fashion fabric of the fall to the lining of the fall.

Clear as mud?  Try this one:


Here's a pair of trousers for sale on Etsy, that I am as sure as sure can be were made from the same pattern I'm using now.  The fall binders are the long strips on the side of the fall, with the button at the top and the pointy bit at the bottom.  (Here's an actual pair from the V&A, which if you enlarge the image and turn up the brightness on your screen you can see similar binders.) Trying to get all this to line up, particularly with a slightly thick wool that doesn't really want to press, was driving me up a tree; the more since, even with having made the muslin, I didn't really grok how exactly the geometries were working.  And of course, because I had to frob parts of the pattern for correct fit, none of the marking dots were lining up for me.  I finally decided to set it aside for the evening...whereupon five minutes later I stood up and parsed it out enough to start from a better position on my next window of work.  So that's OK, but I was still rather stressed and upset, a situation that was not helped by our apartment hot water now not going above 100 of your Earth Fahrenheit degrees for the whole week so showers are restricted to "tepid at best".

The final insult-to-injury, well, let's have a picture worth 1k words:


re-creation of Sharpe's pants...though not
100% accurate anyways as his actual
trousers were cavalry trousers with
leather lining on the crotch & inseam
What do we not have any here?  FALL BINDERS.  The trim is performing the work of holding the fall and lining together instead. So I didn't really need to fuss with the stupid things in the first place.  :-/  I guess it's just as well, though, since I haven't found the right trim yet, so I'd've been at a stand-still until I did.


Tuesday, October 6, 2015

Early Victorian Unmentionables

Grommeting is fun but should not be done before 11am on a Sunday morning
 I was determined to get my underpinnings (corset and chemise) done this weekend.  This proved to be an....aspirational goal, to put it mildly, though not for the reasons I anticipated.  I had thought that getting the corset busk and eyelets in place would be massively time-consuming, but in fact it was about two hours in total.  Indeed after diligent work Saturday evening and a little of Sunday morning, it's ready to have the bones taped in one mo' time and the thing laced on for a final fit check.  (I did, however, realize that I made my pen marks on the right side of the lining fabric, because I was thinking of it as the fashion fabric, and...eh well.  No one will see it but me.)  Anyways the tasks remaining...if I have not screwed it up completely...are:

  • Sew together the cotton sateen outer layer, attach to the center-front and center-back pieces on each half of the corset (quick machine work)
  • Tack the fashion fabric and lining together along each seam (hand work, but still relatively quick?  But there are a lot of seams)
  • Sew the boning channels (quick machine work)
  • Insert bones (10 seconds)
  • Bind the top and bottom of the corset (eh...probably hand work)
...Then I realized how much work that all adds up to, and a slow tear rolled down my cheek.

ANYways.

I had set the corset down for the time, because I wanted to have the chemise ready in order to fit the corset over it; not strictly speaking necessary, but I figured it would help me confirm that I had the look reasonably correct.  Also, I thought it would be a quick and easy win.  HA HA HA no

The chemise of the mid-to-late 19th century has a form that I was not expecting, though many of today's nightgowns are not dissimilar; there is a yoke piece that covers the upper torso, front and back, and then the rest of the body is a wider piece of fabric (front and back, again) which is thus full over the belly and hips but is gathered into the yoke piece.  And then you can have sleeves, or not, as you choose/your decade dictates--and if you do, they are also gathered.

I expect the corset pushes
the bQQbies up into
those curvy front parts of
the yoke.
That's a lot of gathering.  Also, gathering is time-consuming.  Also, easing all of this crap into all of these curves is super-time-consuming.  And finally, a lot of that really should have been hand-sewn, because trying to get all those curves in a reasonably small space without catching folds of one of the layers was something I kept failing to do by machine, leading to lots of cussing and seam-ripping.

However!  It is mostly done; I have only to sew down the facing all the way around (more hand-sewing, but relatively quick) and do whatever weird finishing you're supposed to do on the center front, which I am having some issues visualizing from the directions but I'm sure it'll work out. I should, of course, also hem the sleeves and the bottom, and maybe make some pretty tucks on the skirt, but at this point I am madly tossing requirements overboard like lead bricks from a sinking lifeboat.  

But it's actually looking like a garment.


Friday, October 2, 2015

95th Rifles Uniform: Panic At The Disco

One of those is my right brain, one's my left brain.  I leave it to you to determine which is which

This week, October started.  That means I'm down to T-30 days, and shit be gettin' real, as the kids say; and as of bedtime Monday I still had not put scissors to a single piece of fashion fabric.  Monday evening was slated for admin tasks: go through fabric swatches that had arrived in the mail, work out what bones I really needed for the corset (the ones calculated by the pattern size were unsurprisingly too long, since I am short and squat), order the 65 buttons to sew on the uniform coatee, etc.  However, what actually happened is that I fell down a rabbit hole of Too Much Information, which was both a) very helpful and b) incredibly daunting.


Because Sharpe's coat didn't have ENOUGH
buttons.  D:
Said rabbit hole was a forum for the 2/95th Rifles re-enactors in Britain, who (like most military re-enactors) are some pretty serious cats.  Specifically it was a thread in which one of their chief tailors set out on a commission to make a full outfit for a new officer recruit; he continued to blog his progress via thread updates, culminating in photos of the finished product (which looked pretty darn amazing, at that).  If you are curious, you can check out the thread here, but for the TL;DR contingent, let me just sum up by saying the project took him about six months.  six.  SIX.  In vain did I console myself that it wasn't the only project he was working on; in vain did I reason that he was making the entire outfit, not just coatee and trousers.  All I could hear was SIX MONTHS.  Though, on the bright side, the thread also supplied me with some details and descriptions of both the only surviving officer's coat of the era (which is in the Royal Green Jackets museum, but not pictured anywhere on their website, grr) and some other details they had painstakingly exacted from other primary sources.   Long story short, here are my takeaways, as they used to say in meetings:

- Sharpe's trim is soutache (or Russia braid).  The originals used silk twisted cord. Soutache being thicker, that's probably why they just made Sharpe's buttonholes as loops made out of the trim, rather than for-realsies buttonholes.  I'm having an impossible time finding wide enough soutache (usually what you see is 1/4" or smaller), and also soutache is harder to sew. On the other hand, since the cord is narrower, they fit a lot more buttons.
RESULT: I will use twisted cord, but space it all out more like Sharpe's.  Might use wider cord, too.

- The odd three-tab bottom on the back of Sharpe's coat is a misunderstanding of the vestigial cornered tails on the back of the original. 
RESULT: I will make the pointed tails like in the original, which will also avoid the "I can see your shirt peeking out" problem.


This is Walter Clarke's actual jacket.
Note the bottom center.
see the tabs there?  Someone didn't grok what he
was looking at.

- There's still something weird going on with the cuffs between this one and Sharpe's.  They look the same, but somehow the buttons come out different?  
RESULT: handwave the shit out of it.

- [Extended dither about fabric goes here.]
RESULT: use the excellent wool twill; and when I have the buttons in hand, give them a good heft, figure out if I'm going to need to interline, and do the job.

Anyways, all of these results are well and good now, when I've thought them through and come to decisions; but in the moment I went to bed with a teeming brain...and then woke up in the wee hours with my heart thundering as if it was going to burst out of me like a baby Alien.  Pulse up from my usual ~70 to a good 95 beats per minute. It took about an hour and a half to calm down and get back to sleep.

And then I was adrenalized, twitchy, and on edge during the day.

And then it happened again the next night; und so weiter.

I have, at the earnest representation of my friends, taken medical advice, and it would appear that this is some sort of anxiety or panic attack.  Just knowing that has helped somewhat; and I've taken more positive action, and I've written everything (!) up into a work breakdown structure, and I feel like the physical symptoms are in abeyance.  But I'm really torked about having to waste cycles on this.  OBEY, MEATSACK PARTS.

(In the words of one of my sewing circle: "Have you considered taking on projects with fewer bees in them, which will reduce your chances of becoming Covered in Bees?")


Tuesday, September 29, 2015

19th Century Project: Every Day I'm Muslin'


Jerry likes muslin piles.
There are those experienced sempsters and tailoresses who, I am sure, can go forth armed with a pattern they have never seen before and immediately produce a perfect garment; I imagine it like the equivalent of sight-reading a symphony, or being able to hear a song and immediately play it.

The rest of us create a muslin, which is called thus because it's usually made out of muslin, though not always (e.g., for a corset you need to use a far sturdier fabric).  This gives you plenty of low-risk opportunity to a) figure out how the pattern works and b) make sure it fits on the test subject.  Then, depending on your situation and preference, you can either use the amended muslin pieces as your final pattern, or you can back-port the amended muslin to your paper pattern.  And then, at last, when you know what you're doing, you make your actual garment.


This is what a corset looks like before it's sexy.
Muslin the First: the corset.  I cut this out & basted it together weekend before last, actually, and taped the bones in rough place with masking tape (there has to be enough structure in place to confirm you're getting the shape and support you need, but ain't nobody got time to do the full monty of sewing boning channels for this).  At that point, unless you're a wizard, you need a second pair of hands to pin it closed and check your fit, which happened later in the week.  Beth came over last week to do that service for me; we calculated the necessary edits, and I've cut out & sewn the re-engineered pieces.  Waiting for final fit, and then I can Make The Thing.  (And once the Thing is Made, then I can make the muslin for the dress.)
The Back View. You
can make some shortcuts
on the muslin, like only doing
one sleeve

Muslin the Second: the uniform jacket.  This was not as straightforward because I'm modifying the pattern; not in structurally significant ways, or shouldn't be, but I needed to completely understand the base pattern to ensure that my edits didn't have unintended consequences.  Which, happily, they did not, and the muslin went together quickly and fit, mirabile dictu.  I can work directly from the paper pattern and just cut across the tail part (with one small edit, about which more in a subsequent post).  

Muslin the Third: the uniform trousers.  groan
not that you can really
see the moon here
Let me preface this by saying that I've made, let's see, two pairs of generic-SCA-medieval-oid pants and four pairs of Venetian hose (which are pants that come down to the knee or so), and there's still a lot about pants that just do not make sense to me.  The pockets alone on the Venetians took me the better part of a week to suss; and Venetians are, for the most part, a simplified version of modern pants.  Regency trousers are very, very different.  There are pockets...a completely different kind of pocket...and there are front falls (think a drop-seat like in comical old cartoons, but at the front) and they sit very high and they are tight in front but roomy in back, completely opposite to how things roll now-a-days.  So, I knew I had to do a full muslin rather than just "here's a leg and here's a waist and do they work?"  I also had to math the pattern a fair bit to fit the subject (there's a reason a Regency gentleman's tailor was his most prized engagement, I am discovering).  But I have got a fair way towards figuring it out, and might have had it done except I had to pause operations to go look at the SuperBloodMoonEclipse.

So, that brings us to Sunday night.  In the meantime I've been working on sourcing my remaining fabric & notions, with mixed results (that is, "none" and "utter confusion").  I've also found a bunch of good photos & information of the only existing period uniform tunic, which incidentally generated what appears to have been a panic attack last night.  Tune in next episode for the exciting conclusion!

Thursday, September 24, 2015

95th Rifles Uniform: A Deeper Dive

Bertie surveys the pattern details
All my patterns have arrived, and after spending a couple of days picking at the corset (more about which in a post to follow), I feel tolerably confident about my outfit, so I switched tracks to work on the uniform.  Figured to start with the coat, as it's going to be a much harder job.

I'll be in my bunk.
I read the pattern instructions first, as you do, and was still failing at visualization for many of the steps, so the next step is to cut out the pattern pieces and see if enlightenment is gained by having tangible things to look at and play with like a chimp fitting block shapes into holes.  The basic pieces were pretty obvious, but some of the detail pieces were not working in my head, so (after a futile bit of Google Image Searching) I finally put "Sharpe's Eagle" on the actual teevee.  Now, I chose that because it's the best episode, IMAO; but it was an exceedingly clever choice on my part for two reasons; one, because there are a good number of close-ups of Sharpe in (partial) flagrante, so you can see some bits of coat construction; and two, because there's scads of the regular infantry in it, who are wearing the bog-standard pattern coat as she is wrote.

Here's Sharpe in a regular redcoat; note the
"looping" (the shiny giant equals-signs on his front),
the skirting/tails, the pocket, and the epaulette
So, there were (at the start) two angles for me to consider in modifying the pattern; the first being, how do the 95th Rifles uniforms differ from the regular infantry? and the second being, how does Sharpe's uniform, as an officer, differ from the rank and file?  And later, another issue spawned, to wit: how does Sharpe's uniform as depicted in the show differ from the historically-accurate--and are we re-creating history, or cosplaying Sharpe?  After the evening's diligent attentions (ahem), here's what I've got:

  • Coat skirting: Reg. inf. have skirting that comes most of the way to the front, with braid; 95th Rifles' rank-and-file have a swept-back and unadorned skirting more akin to the classic Regency tailcoat; Sharpe himself has no skirting at all.
    • Sharpe's jacket is actually a little shorter in back.   It's also divided into three tabs, probably for ease of motion.  I think this is none of it historically accurate; it keeps popping up to show his shirt in back when he moves, which is Not The Thing; and the jacket is most like the hussar and light dragoons coatees, which are either straight around the back or have a very very vestigial coat-tail.
  • Front closure/ornamentation (these are a conjoined concept):  Reg. inf. have buttoned coats with large-format "looping" of particular regimental lace--a good part of the pattern is devoted to dealing with this.  The Rifles just have three rows of buttons, of which the center set is the actual closure.  Rifles officers, well--they have jackets à la hussarde, that is, based on the fancy-dancy Hussar regiment: tons of braiding.  Though, being skirmishers, the Rifles do not have braid of gold or silver, but of sober black.  More interestingly, though, unlike most of the repros-for-sale I've seen, Hussar-style jackets don't just use the trim to ornament the buttonholes; the trim extends off the center front and becomes the buttonhole!  So the good news is, this means (in theory) no buttonholes.  However, I am curious as to why most of the repro people are not doing this.  
    • This is a French hussar pelisse,
      but you get the idea
    • Fun fact: Sharpe's jacket does work this way...but he also has about half a dozen hooks-and-eyes fastening the center front and a dark green (cotton?) placket.  Clearly this is for security and/or to prevent unsightly gapping, but I haven't yet seen any historical evidence for this being A Thing.  I wonder if this plus the odd back tabs means that they made the jacket before casting Sean Bean, and they had to do some quick retro-fitting to make it work on him?
  • Cuffs: The regular infantry have straight-edged cylindrical cuffs with more of the big boxy looping on them.  The Rifles, officers and men, have the Hussar-style cuffs with a pointed edge, which for the officers is in black velvet with more of the trim above it.
    • Sharpe's cuffs are set with five buttons (which is accurate to the official regs) but the buttons are above the cuff facing; there doesn't seem to be any catch or hook so that it closes at his wrist.  Though he's enough of a ragamuffin that it could have just come off, I guess?
  • Pockets:  Infantry have 'em (ornamented with yet more looping), Rifles don't.  That's easy.
  • Waistcoats....so.  I don't think rank-and-file of any flavor have them.  Infantry officers do.  Hussar officers might?  But I don't see anything in the regulations or in the show to indicate that Rifles officers did, so I'm leaving it out.
After this data sorting, I think I'm ready to cut out the muslin.  I'll start by cutting it straight across the back and see what that gets us, fit- and movement-wise...though I now wonder if I didn't ought to cut out the trousers first, as they sit in a very different place than modern ones do, and then I can make sure the coat lands where it ought.

Bonus round: here's a blog post from someone who did a full-on Hussar kit for a Jane Austen ball.  (I only wish she'd included more background info about the waistcoat.) (Note that it closes with hooks-and-eyes...!)

Sunday, September 20, 2015

Getting the 19th Century Underway

Here's me last week.
If you've ever played a fairly ridiculous RPG called "TORG", which you probably haven't because it was silly even by the standards of the wildly-proliferating RPG scene of the time, you will know that every time you got something accomplished you would inevitably get a "Setback" or "Major Setback" card played on you to fuck your shit right up.  This made it a very annoying system to play...and yet, remarkably true-to-life.  At least, it seems as if any time I have a big ol' project to undertake and think I may actually have it under control, the Invisible Hand of Narrative slaps some kind of additional hurdle, setback, or resource issue on me.  In this case, I came down last week with some kind of nameless lurgy that exhibited chiefly as a constant low-grade fever, headache, and inability to concentrate.  Doubly frustrating, because if I'd just had a cold or something, I could at least have lain on the couch and worked out my project plans & so forth.  But I couldn't brain enough to do that, or even post to this blog.  Grumble.

Anyways, I'm feeling somewhat more myself this morning (and I was having anxiety dreams last night about the project), so it's time to buckle down in.  Let me lay foundation that I have formed based on last post's sketches--


Also, this is just bitchin'.
For myself, I have procured Laughing Moon pattern #100 from which to make a bust-darted corset, chemise, and drawers; and pattern #117 to make the gown (I intend to make View A, possibly with pleated sleeves).  I am starting to think pretty seriously, though, that pattern #115, the Regency/Romantic era corset, is more correct for the gown I want to make.  Because, hey, let's slow down the production schedule even more! But the time I'm circling in on is the very end of the 1830s, and the designs are different enough that I can see it making a difference.  (Particularly, there's the shoulder pieces in the pre-1840-something corsets; and there is a solid front busk; and the patterns of support appear to be running in very different directions.)  

I am internally weeping at the fact that, whichever pattern I end up choosing, I still have to make up a muslin of the corset before even starting to make the corset itself.  And I have to do all of that before starting the dress itself, because the dress must of course be fit to the corset.  And I'll need to make a muslin of at least the dress bodice, too.  wah.

In addition to a ton more muslin wah I need to procure poplin or similar cottons for my chemise, and possibly as fashion fabric for the corset.  (I think I have enough heavy cotton twill to serve as the functional corset layer, though I have to measure it out.)  And something to serve as the bodice lining for the dress.  But!  I do have my fashion fabric for the dress!  It is a beautiful heavy gold silk shot with blue with an almost corduroy-ish texture, though as you see from the swatch photos here, I shall have to be extremely cognizant of piecing it together since the color changes pretty dramatically depending on what angle you view it from.
The "normal" view, gold
rotate 90 degrees, and lo! blue!

Fortunately, neither muslin nor decent cotton shirting should be hard to find.  Maybe not JoAnn's, no, but a quick troll through the garment district should do me.  I just have to make time for it, argh.  (I do also have to think about any notions for the dress.  One of the things that attracted me to the 1830s was that the fabric is the chief interest of the garment; there was very little, comparatively, in the way of frills and furbelows; but some ribbon or lace around the sleeves may be in order.)

So, that's me.  Deep breath.

For my lovin' man, I have coming in the post the Kanniks' Korner pattern for men's high-waisted, front-fall trousers, which seems to be well regarded in the military re-enactor community; and Past Patterns' British Foot Soldier's Jacket, which is for any time in the Napoleonic wars.  Diligent research indicates that the 95th Rifles' coatee isn't really different in form factor from the regular infantry, just in color and decoration, so I'm really hoping it will do.  The shirt I can make on my own (or in the worst-case scenario, he can wear the low-collar, plain-cuffed shirt I made for his Elizabethan wear; the details haven't changed that much in 200 years, to be honest).  And, we just need to procure a black silk(-ish) handkerchief for the stock, and a red silk(-ish) piece to use as a sash.  Should I be over-burdened with extra time, HAR HAR HAR, I did find a book in the FIT library with detailed instructions on how to make a shako.  We shall see.

Fabric-wise, the main matter is procuring dark green wool broadcloth...which will not be cheap, oh no...plus an appropriate lining fabric for coat & trousers, and black trim for decoration.  Happily, I already have a ton of black velvet to spare for the coat collar and cuffs.  (I'm waiting for the patterns to arrive to be sure, but I may be able to get away with just using plain white linen for the lining.)  Oh!  And dome-shaped pewter buttons.  Though that should be simple enough.

I started writing this post in the hopes of clarifying my thoughts and identifying next steps.  Instead, it's just making me feel tired and consumptive again. -_-;;;;

OK.  The immediate next step is: decide whether to roll with the later corset pattern, or cause the earlier one to be delivered to me.  Until I make that decision, everything on my outfit is in a wait state.   And everything for his outfit is on hold construction-wise; so what I can do right now is ask for swatches from the places making repro 19th century wools, to see if I think any of them will be suitable.

I don't think I have the vim to pop down to the garment district today.  But, I had better get this slotted in before everyone's closed for Rosh Hashanah Yom Kippur blame the antihistamines.


Saturday, September 12, 2015

Here Be Dragons: The 19th Century

AAAAAAAAAAA
As darkly hinted at in previous posts, the next project rushing towards me like a bullet train is not just a) soon and b) important, it is also c) something I know nothing about.  Namely and to wit, some dear friends are getting married on Halloween, and they are having an historical theme.  The wedding party themselves will be high Victorian, but any historical era is welcome.   (And yes, we could certainly roll up in 16th century...and I'm keeping that option in my back pocket in case everything goes completely and utterly pear-shaped...but seriously that would be cheating.) Now, I have a lot of aesthetic appreciation for the dresswork going on in the late 19th century, but honestly it's not a period that really makes my heart sing, so I decided to ratchet it back a little earlier because, okay, let's be honest, I really want to see my blonde Yorkshireman in tight green wool trousers.

can I get an "Amen" or possibly a "Hallelujah" for Sean Bean as Sharpe.

So what I'm looking at for my lovin' man is a reasonable approximation of a Napoleonic Wars-era 95th Rifles uniform.  The garments themselves break down thus: 
hatten ar din.
  • A white shirt which hasn't really changed that much over the centuries; that's easy
  • Dark green front-fall trousers, should be wool, we can compromise a bit there due to expense and probably what will be a very warm venue
  • Dark green tunic.  With a metric shit-ton of black soutache and pewter buttons. -_-;;;;
  • Bright red silk sash--also easy, particularly if I pretend not to see the fancy cording; there were some that were just silk knotted at the ends and entasseled.
  • Theoretically a black silk stock, but most of the time we don't see Sharpe actually wearing it?  This could probably be left off without anyone noticing.
  • Dark green felt shako with a black or dark green plume, cording, and a pewter badge.  OH FFS.
  • This dress makes her look smokin' hot.
    Ergo it is historically inaccurate for the 1810s. 
  • (And I figure we can leave off the sword because it is after all a joyous civilian occasion.  More to the point that means I don't have to faff around with the leather belt etc.)
Do I have patterns for any of these things?  Do I hell.  There are a couple out there, but they seem questionable at best.  Research continues.  I don't think the actual construction will be particularly difficult (howls of derisive laughter, Bruce) but getting 60-odd pewter buttons plus miles of thick corded trim on everything is going to be a giant shit-burger, oh yes it is.  Not to mention trying to MAKE. A. HAT.

For myself, I'm intending to cheat a little in the opposite direction.  The true Regency style is, frankly, not flattering to any shape, but it is maximally unkind to the zaftig; the sought-after look was slender and willowy, and if you are not that, you look like a stuffed pillowcase.  So I am going to duck up to somewhere around 1830, where you start getting figures again.  And, happily, I do have a source for patterns for that.  And my garments break down thus:
  • Chemise, which is more like a camisole than chemises as we medievalists know 'em.  Should be trimmed with lace &c., but that could be eschewed.
  • Drawers.  Can be skipped.  fnarr fnarr.
  • Corset.  This...will be another load of Not Fun.  But I wanted to learn this technology anyways; might as well do it when there's a gun to my head.
  • Gown.  Silk, should have some lace or other decoration, but considerably less than those poor sods in 1860-1890.
  • Gloves.   Buying them, believe you me.
  • And, if I have time, HA HA HA HA HA, a reticule.
1820; a little earlier, and a lot of work.
But something not unlike a shape.

1828.  Now we're talking.  The fabric
speaks for itself.

Monday, September 7, 2015

Banner Project I: Mission Accomplished

Working As Designed
After a frenzied amount of work Thursday and Friday evenings, there was no more time to whiten the sepulchre, and so the banner was launched on Saturday morning.  In the photo above, you can see it hanging in front of the vigil tent.  

It bugs me that you can see a tiny bit of the lining hanging down--I wanted to hang it overnight to get the fabric weights worked out, and then tack the lower edge of the lining out of sight.  However, we had a bunch of emergency sewing to do for the ceremony itself, and therefore I downgraded this requirement from "important" to "nice to have", whereupon it fell right off the back of the project truck.

Anyways, the recipient expressed her great happiness with the banner, and that's the important thing.  (You can read her account of the whole day here.  In fact, just read her blog.  You need more 16th century French in your life.)

Lessons learned:

  • Always apply some form of fray-checking.
  • With multi-layer motifs like the daisies, attach the center before basting the outer parts.  Ended up with a lot of pooched daisy petals.
  • ...but still baste before going over the outer edges of a motif.
  • I need to pad my time estimates even more than I have been.  -_-;;;;
  • It's as helpful to have an embroidery frame for something this scale as it does for fine work.  (Though, you couldn't use a traditional hoop because it would mark the velvet; so it'd have to be the thing where you baste it to backing fabric and lace THAT to a frame.  What a *$@& pain.)

Next up: making an 1840s ball gown for me, and a Napoleonic-era 95th Rifles uniform for my lovin' man, for a Halloween wedding we are attending.  D:

Thursday, September 3, 2015

Banner Project I: Down To The Wire

All heraldic elements in place, woo.  OKAY SOME ARE PINNED ON STILL SHUT UP
It's been a little while since I've joined you, Gentle Readers, because I've been on the hop.  I went away for the weekend for an Intense Sewing Experience...which yes, happened to be at the beach...but I'm happy to say that much work was done; not only on this here project, but other elements of this coming weekend's festivities.

I had a slight setback when I sewed the first daisy on, discovering that it doesn't matter how tidy and fine your blanket stitch is, it's not going to stand up to the fraying power of poly-cotton brocade, let alone a thick pile cotton velvet.  So, I had to stop production and prepare strange unguents which I then brushed along every. edge. of. every. daisy. and daisy. center. with the tip of my finger; and then set them all to dry.

Meantime, I worked on the needle.  I cut it out of a really lovely blue silk taffeta, but wanted it to have a bit more dimensionality, so padded it with two layers of a fairly close blue linen (cut off an old dress I'm never going to remake) (and the skirt of which is going to be the banner backing, thank you).  I couched silver cord around it and then--I'm rather smug about this--used a thick twist of embroidery floss as the "thread" inside the needle.  
There's still a little trimming to do, too.

The main challenge here was trying to get it all to lie flat, while simultaneously having to bunch the work up so I could actually reach the part I was sewing (naturally right at the middle of the piece).  A big-ass frame would have helped a lot here.  The result is that the silk is visibly pooched in places, which does not delight me.

Artistically, I think it would have looked better to have the needle lying at the same angle as the bend; but that's not what the heraldry says, so there you go.  Take the lesson when registering your arms, people.

Once that was complete, the daisies were dry and I started stitching them down.  This was mostly just a tacking job to keep the petals from curling around, because a) the stitching of the daisy centers would be more than enough to keep the flower itself in place, and b) ideally I will go back and either blanket-stitch or couch a shiny around the petals.  This is the point at which I also realized I had somehow failed to fray-check two of the daisies.  -_-;;;  I left those for the moment, not having more Elmer's unguents to hand, and continued on with the daisy centers.

SHINY i like the shiny
These are, as previously noted, cut out of a tawny gold-colored velvet that is a veteran of another banner.  I couched around the edge of each one with a doubled gold cord, for a bit of that extra sparkly richness.  As of last night, I had completed about half of them; the rest I can do tonight, and that leaves tomorrow (before leaving for the three-hour drive, wah) to attach the banner backing and create the pole pocket.  I'm calling that Minimum Viable Product.

Once the fun is over, I'll take the thing back, do a proper job on the daisy petals, and get a nice cord to attach along the sides of the banner.

Then I can start on the big project that's due by Halloween.  ora pro me