Sunday, November 20, 2016

The Pourpoint Commission: A Little Lost In The Woods

Current mood:

This didn't help either.
In spite of last weekend's delightful surprise and concomitant confidence-building, it must be admitted that I haven't exactly been tearing out of the gate on this project subsequently.  A good part of this is due to post-election emotions, a combination of "what does it all matter" +  compulsion for immersive escapism[1] which I've found exceedingly difficult to overcome.  But even setting that aside, the problem is that I can't see my path clearly, and that's stopping me from even starting the parts I do have a plan for.  So, let me try and lay it all out.

I have established that the pieces much be stretched for quilting, or the quilting won't work. -> It is known that Red Charlie was done this by stretching the base fabric on a frame, and then putting the padding and then the fashion fabric on top, and quilting 'em all together. -> Logically, since the same guild would make Red Charlie and Gold Charlie, they'd do the same technique.  (And also, I can't figure out any other way to do it given the original postulate.)

Points of question:

  • This is somewhat wasteful of the base fabric, as you have to have enough unused space around the edge to attach it to the frame. Is that cricket?
    • I think that's OK for this project because it's a rich guy's garment and if he's affording silk damask he doesn't have to give a tinker's dam about a few scraps of linen--but it opens the question of, how did they do the common soldier's aketon?  He can't afford it.  What's the process for him?  And what am I missing by not knowing it?
  • Stupid minor nit: what is the best analogue for period silk sewing thread?  I used silk buttonhole twist for quilting the swatch, and it worked well, but is it right?  Even St. Janet didn't specify anything other than "silk thread".
  • How does one actually do the assembly?  My assumption is:
      1. Draw the pattern pieces onto the base fabric
      2. Stretch base fabric on frame
      3. Cut out the pattern pieces in the fashion fabric
      4. For each piece, put a bunch of tow on top of it, and then the fashion fabric on top of that
      5. ??? Stitch?
      6. Profit! 
    • But I'm not sure if one ought sew around the edges (say, just inside the seam allowance) to make a "pillow" like I did for the swatch, or just quilt away, and what the ramifications are in either case.
  • And even then, how the heck do you pad the sleeves?  
    • We know[3] they're assembled pre-quilting, so it can't be approached like the above method.
    • So. You have to quilt a piece shaped roughly like a giant wedge of cake.  How?
      • Embroidery Option #1: Lace it into a slate frame.  
        • I'm pretty sure this won't work because the piece is too heavy.
      • Embroidery Option #2: Tack it to a larger piece of fabric and stretch that to your frame.
        • Non-starter; it would mean there's another piece of fabric on the sleeves, and there isn't.
      • Quilt it without stretching it.
        • I have pretty conclusively shown why that doesn't work (unless there's some magic-bullet technique I wot not of).
      • Build a blanket fort and snivel in confusion.  <--- YOU ARE HERE
      • The only thing I can think of is to do it on a very small frame and moving the work section frequently; but I foresee challenges in trying to tack down the parts that are already padded.  I'm not sure it will work at all.  But this is the least worst option I have come up with.
It's funny; I used to merrily plunge into things with no clue of what I was doing and deal with problems as they appeared; and after long and painful experience (both at work and personally) I finally learned to plan everything out, gather my information, line it all up, and then proceed.  So of course, now I have to un-learn all of that, and remember how to be careless again.  Wait, what?

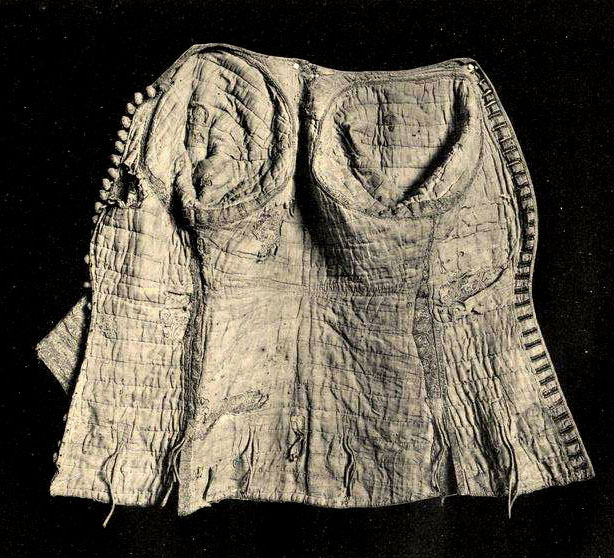
This is the best photo of Gold
Charlie's inside that I could find

[1] I've been replaying Skyrim.  Because getting chewed on by giant bears and hacked up by deadites[2] seems like a more promising environment.  At least they *have* an environment, which we soon won't.

[2] and at least I can shoot the bad guys with my trusty bow; not a winning strategy for real life.

[3] Do we know this for certain sure?  The quilting lines really, really look like it, and it would be the natural conclusion from looking at them.  But the inside construction has never been truly studied, AFAIK; and if you've eliminated the impossible--

Monday, November 14, 2016

So, This Happened.

*kermitflail*

Warning: SCA inside baseball ahoy

Saturday, after a lively and interesting arts & sciences competition[1], we settled in for a long winter's nap court, a game which I expected to have exactly zero skin in.  Imagine my surprise when I got called up before the Queen and inducted into the Order of the Maunche, which is Kind Of A Big Deal.  I will not swear that I wasn't a bit teary-eyed, but I firmly deny bawling my eyes out in the back afterwards, even if someone managed to get it on film.  It's obviously Photoshopped.

(Yeah, I have two medallions!  One is a tiny goldwork pin Beth made for me, having taken note of my muttering about how, meaning no disrespect to storied traditions, having a big ol' device worn as a pendant is super not-period for practically anywhere in medieval Europe {particularly when you have several of them jangling around your neck); the other is an Ancient & Honorable old-school medallion of our family and I shall wear it with pride when I'm not gussied up in spite of those mutterings.) 

What now?  Well, much as with marriage with someone you've already been living with for years, both nothing has changed and everything has.  I'm not going to stop doing what I'm doing; it does not change my project list (or my angst about it) one iota.  But there's a reason that thar scroll says "...and responsibilities therein attendant".  The tangible and obvious one is to make recommendations to the monarchs regarding other candidates, but that unpacks to some serious activity: seeking out the work of artisans I don't know, paying attention to the ones I do know, helping, guiding, advising, and in all ways working to support and further the arts.  This is not a small thing, particularly as it runs counter to my preferred state of existence, namely "melting into the background".  HELLO PERSONAL GROWTH  


[1] I didn't win anything, but I didn't particularly expect to; it's not as if I had a finished piece or anything, just a work in progress.  What I did have is lots of good conversations.

Sunday, November 6, 2016

The Pourpoint Commission: Getting Down To Brass Tacks

FOR REALSIES
i have been waiting so very long to use this joke

I spent some time yesterday morning wandering through the retail wonderland around the country estate looking for proper-sized embroidery frames to use for the $@&! swatch, and came up empty.  (Michaels did have a small version of the Muckin' Big Quilting Frame, but I figured the snap-on PVC bits were not going to be super-successful with the thickness of padding I have {since I didn't leave enough border around the padded center to clamp it down just on that}.)  Whereat the beloved redhead pointed out that, if all I needed was wood assembled in a square shape, we could easily get wood and nails at Home Depot and bang it together in his garage.


Today, on Blue Peter...
Well OK then.  $11 later, we had four wood bits cut to roughly 8" length; a packet of nails; a packet of sandpaper; and a bunch of, yes, brass tacks.  It wasn't quite as simple as that--the nails started to split the wood, because it's cheap-ass crap, so we had to drill the nail holes; but within about half-an-hour I had a Functional Square Thingy with the rough bits sanded down so as not to catch on the swatch (unlikely) or me (very likely).  It is not pretty and it is not even and it will win no prizes, but it was fast and cheap and sufficient for the work before me. I had a little bit of worry that I wouldn't be able to get the tacks into & out of the wood--there is a special doover that the embroidery peeps use for this purpose--but a) I have a hammer and b) this is why I bought the packet of 200 tacks.

I got it home and started futzing with it, and somewhat to my surprise, it wasn't too tricky to get the piece stretched on the frame.  For the most part, I could just push the tacks in with a reasonable amount of force, though there were a couple places where they just would not, but banging on them with the nearest rock sufficed.  I started with the tacks spaced about 1.5"-2" apart, but I was still getting some play, so there's now one tack per inch on each side.  And now, the quilting.

An hour of solid work. *sob*
Fun fact: even with the linen stretched mightily across the frame, the cotton tow is still thick and loose enough that even if you stab your needle straight through the piece, there's a lot of airspace inside for it to come out somewhere...else.  Dramatically else, in fact.  So, I'm having to stab the needle down on its marking line on the top (which is actually the bottom, never mind[1]), flip the frame over, make sure the exit point is in line on that side, pull the stitch tight, and do the same thing in reverse.  For every single stitch.  This is...not fast.  But it is working.  And, on a positive note, I am not having any problem at all getting the needle through the layers, so hooray for bowing the cotton.  And I'm getting an average of 6 stitches per inch, which is still pretty kindergarten-level as quilting goes, but meets Minimum Viable Product.

I'm not anticipating moving the work forward today much, since my dashing consort and I celebrate three years of togetherness on this day[2] and we intend to go out to the Botanic Gardens and then come home and make a full Sunday dinner in our new celebratorily-purchased Le Creuset roasting pan[3], but at current rate of progress I am tolerably confident I can still finish this in good time. If the world doesn't end Tuesday night, anyways.

Also, I bloody hate Daylight Savings; or at least, not specifically being in GMT -0400 vs -0500, but changing the clocks abruptly.  It completely messes with my internal time sense (which is why it's 8am on a bloody Sunday and I've already had coffee, apple crisp, and a full blog post) and it also makes my cycle commute a ton more dangerous.  MAKE IT STOP.

[1] I have it upside-down on the frame (i.e., lining on top) because that's where I marked the chalk lines to quilt along (in sad and uneven fashion; see previous post's footnote about marking these before you stuff the piece, you numpty).
[2] The date is actually tomorrow, but it's a work day and we're going with a bunch of people to see Doctor Strange, so.
[3] yes, we are some goddamn party animals around here


Thursday, November 3, 2016

The Pourpoint Commission: Two Steps Forward, You'll Never Believe What Happens Next

I AM DOING CRAZY THINGS AND
MAKING A GIANT MESS WOOOOO


The last several days have been something of a roller-coaster ride. As previously alluded-to, on Sunday I was kindly lent a bow by a fellow artisan, and had a go at bowing cotton. What, you may well ask, is bowing cotton? It's exactly what it sounds like; but to answer the actual question, what you're doing here is taking the cleaned but still very clumpy raw cotton and breaking up the fibers; it is kiiiiind of like combing or carding wool, except that part of those processes is also geared towards aligning fibers to make yarn, and we are not doing that here; the sole object is to make the cotton evenly foofy and no longer clumpy. Why twanging the fiber against a bowstring is a great way to do this, and who thought of it first as a clearly obvious solution, are matters of complete opacity to me.

But it sure as heck works. 


Two portions of cotton, each 30g, pre- and post-bowing.
...Eventually. For the first half-hour or so, I was just sort of holding the bow casually at waist height and kind of twanging a little bit; this was working slightly, but very slowly and ineffectually, and I was getting a blister on my thumb from holding it strangely.  As well, the bow was strung upside down (this is a bow where that matters).  Once we re-strung it, over my protests of "it's fine really I am sure it doesn't matter", and I held it like an actual bow (as seen, in, ya know, the video I was attempting to follow), suddenly it started working like gangbusters; thus leading to the immortal battle-cry of "Things work SO MUCH BETTER when you do them right!!"   I think I need to have that translated and use it as my motto.   But, in any case, after about three hours I had a mighty chunk of bowed cotton, where "mighty" equates to 30 grams.[1]  (This was not an arbitrary number; I had calculated that as the weight of cotton batting I'd used in the first swatch.)  

I still thought it best to baste the border around my swatch so that the cotton would not come oozing out, so I did that thing[2], and then figured to lace it into my Big-Ass Quilting Frame™ as you would into a slate frame.  That was a glorious plan, oh yes it was.

The ultimate visual representation of *sad trombone*

Physics was clearly not on my side here and I realized I was going to need a different solution. My first kludge was to try sticking it in my biggest embroidery hoop, but the stuffing proved way too thick for that. The next fallback option is to get a frame of a more reasonable size. Well, I had meant to get one for embroidery projects anyways...but this is not the kind of thing you can usually rock up to your corner store and grab, or even get on Amazon; and I have blithered away far more time than I can comfortably spare already; I really need to be cracking on this. I have a couple irons in the fire and hope to have some kind of solution by Sunday, but AAAAAAAA.

Even putting the swatch aside, this has caused me to have some deep and uffish thought about how to do the actual bloody garment. I'm used to making garments in what I guess you'd call a piecework kind of way: cut out the pieces, make up the pieces (for however much or little that calls for), join the pieces. The more I chew it over, the more I'm thinking that's not how you can approach this work; I think it has to be done in the same way as the "3-D shapes on a flat ground" method, where the lining/base layer is stretched on a frame and the padding & fashion fabric are built on top of it. (Of course, less engineered than that technique, so simpler. Yay? I think?) I don't see any other way to make it work. If any of my illustrious readers has insight here, I shall be eternally grateful. And will bow lots of cotton for you.


[1] Also some quite sore shoulder and arm muscles that would be much worse the next day.  If only this was an easy motion to do with the off-hand as well, it could be a great workout--and it would produce something useful for your time, which is the core problem with a lot of exercise routines.
[2] Another Learning Experience: draw the quilting lines on the fabric before you stuff the piece, you numpty.