Tuesday, September 29, 2015

19th Century Project: Every Day I'm Muslin'


Jerry likes muslin piles.
There are those experienced sempsters and tailoresses who, I am sure, can go forth armed with a pattern they have never seen before and immediately produce a perfect garment; I imagine it like the equivalent of sight-reading a symphony, or being able to hear a song and immediately play it.

The rest of us create a muslin, which is called thus because it's usually made out of muslin, though not always (e.g., for a corset you need to use a far sturdier fabric).  This gives you plenty of low-risk opportunity to a) figure out how the pattern works and b) make sure it fits on the test subject.  Then, depending on your situation and preference, you can either use the amended muslin pieces as your final pattern, or you can back-port the amended muslin to your paper pattern.  And then, at last, when you know what you're doing, you make your actual garment.


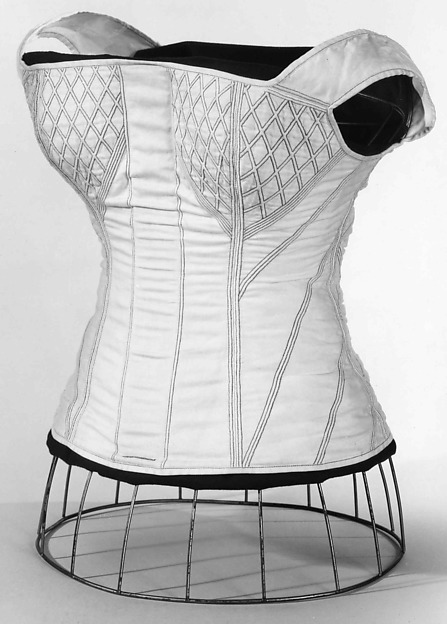
This is what a corset looks like before it's sexy.
Muslin the First: the corset.  I cut this out & basted it together weekend before last, actually, and taped the bones in rough place with masking tape (there has to be enough structure in place to confirm you're getting the shape and support you need, but ain't nobody got time to do the full monty of sewing boning channels for this).  At that point, unless you're a wizard, you need a second pair of hands to pin it closed and check your fit, which happened later in the week.  Beth came over last week to do that service for me; we calculated the necessary edits, and I've cut out & sewn the re-engineered pieces.  Waiting for final fit, and then I can Make The Thing.  (And once the Thing is Made, then I can make the muslin for the dress.)
The Back View. You
can make some shortcuts
on the muslin, like only doing
one sleeve

Muslin the Second: the uniform jacket.  This was not as straightforward because I'm modifying the pattern; not in structurally significant ways, or shouldn't be, but I needed to completely understand the base pattern to ensure that my edits didn't have unintended consequences.  Which, happily, they did not, and the muslin went together quickly and fit, mirabile dictu.  I can work directly from the paper pattern and just cut across the tail part (with one small edit, about which more in a subsequent post).  

Muslin the Third: the uniform trousers.  groan
not that you can really
see the moon here
Let me preface this by saying that I've made, let's see, two pairs of generic-SCA-medieval-oid pants and four pairs of Venetian hose (which are pants that come down to the knee or so), and there's still a lot about pants that just do not make sense to me.  The pockets alone on the Venetians took me the better part of a week to suss; and Venetians are, for the most part, a simplified version of modern pants.  Regency trousers are very, very different.  There are pockets...a completely different kind of pocket...and there are front falls (think a drop-seat like in comical old cartoons, but at the front) and they sit very high and they are tight in front but roomy in back, completely opposite to how things roll now-a-days.  So, I knew I had to do a full muslin rather than just "here's a leg and here's a waist and do they work?"  I also had to math the pattern a fair bit to fit the subject (there's a reason a Regency gentleman's tailor was his most prized engagement, I am discovering).  But I have got a fair way towards figuring it out, and might have had it done except I had to pause operations to go look at the SuperBloodMoonEclipse.

So, that brings us to Sunday night.  In the meantime I've been working on sourcing my remaining fabric & notions, with mixed results (that is, "none" and "utter confusion").  I've also found a bunch of good photos & information of the only existing period uniform tunic, which incidentally generated what appears to have been a panic attack last night.  Tune in next episode for the exciting conclusion!

Thursday, September 24, 2015

95th Rifles Uniform: A Deeper Dive

Bertie surveys the pattern details
All my patterns have arrived, and after spending a couple of days picking at the corset (more about which in a post to follow), I feel tolerably confident about my outfit, so I switched tracks to work on the uniform.  Figured to start with the coat, as it's going to be a much harder job.

I'll be in my bunk.
I read the pattern instructions first, as you do, and was still failing at visualization for many of the steps, so the next step is to cut out the pattern pieces and see if enlightenment is gained by having tangible things to look at and play with like a chimp fitting block shapes into holes.  The basic pieces were pretty obvious, but some of the detail pieces were not working in my head, so (after a futile bit of Google Image Searching) I finally put "Sharpe's Eagle" on the actual teevee.  Now, I chose that because it's the best episode, IMAO; but it was an exceedingly clever choice on my part for two reasons; one, because there are a good number of close-ups of Sharpe in (partial) flagrante, so you can see some bits of coat construction; and two, because there's scads of the regular infantry in it, who are wearing the bog-standard pattern coat as she is wrote.

Here's Sharpe in a regular redcoat; note the
"looping" (the shiny giant equals-signs on his front),
the skirting/tails, the pocket, and the epaulette
So, there were (at the start) two angles for me to consider in modifying the pattern; the first being, how do the 95th Rifles uniforms differ from the regular infantry? and the second being, how does Sharpe's uniform, as an officer, differ from the rank and file?  And later, another issue spawned, to wit: how does Sharpe's uniform as depicted in the show differ from the historically-accurate--and are we re-creating history, or cosplaying Sharpe?  After the evening's diligent attentions (ahem), here's what I've got:

  • Coat skirting: Reg. inf. have skirting that comes most of the way to the front, with braid; 95th Rifles' rank-and-file have a swept-back and unadorned skirting more akin to the classic Regency tailcoat; Sharpe himself has no skirting at all.
    • Sharpe's jacket is actually a little shorter in back.   It's also divided into three tabs, probably for ease of motion.  I think this is none of it historically accurate; it keeps popping up to show his shirt in back when he moves, which is Not The Thing; and the jacket is most like the hussar and light dragoons coatees, which are either straight around the back or have a very very vestigial coat-tail.
  • Front closure/ornamentation (these are a conjoined concept):  Reg. inf. have buttoned coats with large-format "looping" of particular regimental lace--a good part of the pattern is devoted to dealing with this.  The Rifles just have three rows of buttons, of which the center set is the actual closure.  Rifles officers, well--they have jackets à la hussarde, that is, based on the fancy-dancy Hussar regiment: tons of braiding.  Though, being skirmishers, the Rifles do not have braid of gold or silver, but of sober black.  More interestingly, though, unlike most of the repros-for-sale I've seen, Hussar-style jackets don't just use the trim to ornament the buttonholes; the trim extends off the center front and becomes the buttonhole!  So the good news is, this means (in theory) no buttonholes.  However, I am curious as to why most of the repro people are not doing this.  
    • This is a French hussar pelisse,
      but you get the idea
    • Fun fact: Sharpe's jacket does work this way...but he also has about half a dozen hooks-and-eyes fastening the center front and a dark green (cotton?) placket.  Clearly this is for security and/or to prevent unsightly gapping, but I haven't yet seen any historical evidence for this being A Thing.  I wonder if this plus the odd back tabs means that they made the jacket before casting Sean Bean, and they had to do some quick retro-fitting to make it work on him?
  • Cuffs: The regular infantry have straight-edged cylindrical cuffs with more of the big boxy looping on them.  The Rifles, officers and men, have the Hussar-style cuffs with a pointed edge, which for the officers is in black velvet with more of the trim above it.
    • Sharpe's cuffs are set with five buttons (which is accurate to the official regs) but the buttons are above the cuff facing; there doesn't seem to be any catch or hook so that it closes at his wrist.  Though he's enough of a ragamuffin that it could have just come off, I guess?
  • Pockets:  Infantry have 'em (ornamented with yet more looping), Rifles don't.  That's easy.
  • Waistcoats....so.  I don't think rank-and-file of any flavor have them.  Infantry officers do.  Hussar officers might?  But I don't see anything in the regulations or in the show to indicate that Rifles officers did, so I'm leaving it out.
After this data sorting, I think I'm ready to cut out the muslin.  I'll start by cutting it straight across the back and see what that gets us, fit- and movement-wise...though I now wonder if I didn't ought to cut out the trousers first, as they sit in a very different place than modern ones do, and then I can make sure the coat lands where it ought.

Bonus round: here's a blog post from someone who did a full-on Hussar kit for a Jane Austen ball.  (I only wish she'd included more background info about the waistcoat.) (Note that it closes with hooks-and-eyes...!)

Sunday, September 20, 2015

Getting the 19th Century Underway

Here's me last week.
If you've ever played a fairly ridiculous RPG called "TORG", which you probably haven't because it was silly even by the standards of the wildly-proliferating RPG scene of the time, you will know that every time you got something accomplished you would inevitably get a "Setback" or "Major Setback" card played on you to fuck your shit right up.  This made it a very annoying system to play...and yet, remarkably true-to-life.  At least, it seems as if any time I have a big ol' project to undertake and think I may actually have it under control, the Invisible Hand of Narrative slaps some kind of additional hurdle, setback, or resource issue on me.  In this case, I came down last week with some kind of nameless lurgy that exhibited chiefly as a constant low-grade fever, headache, and inability to concentrate.  Doubly frustrating, because if I'd just had a cold or something, I could at least have lain on the couch and worked out my project plans & so forth.  But I couldn't brain enough to do that, or even post to this blog.  Grumble.

Anyways, I'm feeling somewhat more myself this morning (and I was having anxiety dreams last night about the project), so it's time to buckle down in.  Let me lay foundation that I have formed based on last post's sketches--


Also, this is just bitchin'.
For myself, I have procured Laughing Moon pattern #100 from which to make a bust-darted corset, chemise, and drawers; and pattern #117 to make the gown (I intend to make View A, possibly with pleated sleeves).  I am starting to think pretty seriously, though, that pattern #115, the Regency/Romantic era corset, is more correct for the gown I want to make.  Because, hey, let's slow down the production schedule even more! But the time I'm circling in on is the very end of the 1830s, and the designs are different enough that I can see it making a difference.  (Particularly, there's the shoulder pieces in the pre-1840-something corsets; and there is a solid front busk; and the patterns of support appear to be running in very different directions.)  

I am internally weeping at the fact that, whichever pattern I end up choosing, I still have to make up a muslin of the corset before even starting to make the corset itself.  And I have to do all of that before starting the dress itself, because the dress must of course be fit to the corset.  And I'll need to make a muslin of at least the dress bodice, too.  wah.

In addition to a ton more muslin wah I need to procure poplin or similar cottons for my chemise, and possibly as fashion fabric for the corset.  (I think I have enough heavy cotton twill to serve as the functional corset layer, though I have to measure it out.)  And something to serve as the bodice lining for the dress.  But!  I do have my fashion fabric for the dress!  It is a beautiful heavy gold silk shot with blue with an almost corduroy-ish texture, though as you see from the swatch photos here, I shall have to be extremely cognizant of piecing it together since the color changes pretty dramatically depending on what angle you view it from.
The "normal" view, gold
rotate 90 degrees, and lo! blue!

Fortunately, neither muslin nor decent cotton shirting should be hard to find.  Maybe not JoAnn's, no, but a quick troll through the garment district should do me.  I just have to make time for it, argh.  (I do also have to think about any notions for the dress.  One of the things that attracted me to the 1830s was that the fabric is the chief interest of the garment; there was very little, comparatively, in the way of frills and furbelows; but some ribbon or lace around the sleeves may be in order.)

So, that's me.  Deep breath.

For my lovin' man, I have coming in the post the Kanniks' Korner pattern for men's high-waisted, front-fall trousers, which seems to be well regarded in the military re-enactor community; and Past Patterns' British Foot Soldier's Jacket, which is for any time in the Napoleonic wars.  Diligent research indicates that the 95th Rifles' coatee isn't really different in form factor from the regular infantry, just in color and decoration, so I'm really hoping it will do.  The shirt I can make on my own (or in the worst-case scenario, he can wear the low-collar, plain-cuffed shirt I made for his Elizabethan wear; the details haven't changed that much in 200 years, to be honest).  And, we just need to procure a black silk(-ish) handkerchief for the stock, and a red silk(-ish) piece to use as a sash.  Should I be over-burdened with extra time, HAR HAR HAR, I did find a book in the FIT library with detailed instructions on how to make a shako.  We shall see.

Fabric-wise, the main matter is procuring dark green wool broadcloth...which will not be cheap, oh no...plus an appropriate lining fabric for coat & trousers, and black trim for decoration.  Happily, I already have a ton of black velvet to spare for the coat collar and cuffs.  (I'm waiting for the patterns to arrive to be sure, but I may be able to get away with just using plain white linen for the lining.)  Oh!  And dome-shaped pewter buttons.  Though that should be simple enough.

I started writing this post in the hopes of clarifying my thoughts and identifying next steps.  Instead, it's just making me feel tired and consumptive again. -_-;;;;

OK.  The immediate next step is: decide whether to roll with the later corset pattern, or cause the earlier one to be delivered to me.  Until I make that decision, everything on my outfit is in a wait state.   And everything for his outfit is on hold construction-wise; so what I can do right now is ask for swatches from the places making repro 19th century wools, to see if I think any of them will be suitable.

I don't think I have the vim to pop down to the garment district today.  But, I had better get this slotted in before everyone's closed for Rosh Hashanah Yom Kippur blame the antihistamines.


Saturday, September 12, 2015

Here Be Dragons: The 19th Century

AAAAAAAAAAA
As darkly hinted at in previous posts, the next project rushing towards me like a bullet train is not just a) soon and b) important, it is also c) something I know nothing about.  Namely and to wit, some dear friends are getting married on Halloween, and they are having an historical theme.  The wedding party themselves will be high Victorian, but any historical era is welcome.   (And yes, we could certainly roll up in 16th century...and I'm keeping that option in my back pocket in case everything goes completely and utterly pear-shaped...but seriously that would be cheating.) Now, I have a lot of aesthetic appreciation for the dresswork going on in the late 19th century, but honestly it's not a period that really makes my heart sing, so I decided to ratchet it back a little earlier because, okay, let's be honest, I really want to see my blonde Yorkshireman in tight green wool trousers.

can I get an "Amen" or possibly a "Hallelujah" for Sean Bean as Sharpe.

So what I'm looking at for my lovin' man is a reasonable approximation of a Napoleonic Wars-era 95th Rifles uniform.  The garments themselves break down thus: 
hatten ar din.
  • A white shirt which hasn't really changed that much over the centuries; that's easy
  • Dark green front-fall trousers, should be wool, we can compromise a bit there due to expense and probably what will be a very warm venue
  • Dark green tunic.  With a metric shit-ton of black soutache and pewter buttons. -_-;;;;
  • Bright red silk sash--also easy, particularly if I pretend not to see the fancy cording; there were some that were just silk knotted at the ends and entasseled.
  • Theoretically a black silk stock, but most of the time we don't see Sharpe actually wearing it?  This could probably be left off without anyone noticing.
  • Dark green felt shako with a black or dark green plume, cording, and a pewter badge.  OH FFS.
  • This dress makes her look smokin' hot.
    Ergo it is historically inaccurate for the 1810s. 
  • (And I figure we can leave off the sword because it is after all a joyous civilian occasion.  More to the point that means I don't have to faff around with the leather belt etc.)
Do I have patterns for any of these things?  Do I hell.  There are a couple out there, but they seem questionable at best.  Research continues.  I don't think the actual construction will be particularly difficult (howls of derisive laughter, Bruce) but getting 60-odd pewter buttons plus miles of thick corded trim on everything is going to be a giant shit-burger, oh yes it is.  Not to mention trying to MAKE. A. HAT.

For myself, I'm intending to cheat a little in the opposite direction.  The true Regency style is, frankly, not flattering to any shape, but it is maximally unkind to the zaftig; the sought-after look was slender and willowy, and if you are not that, you look like a stuffed pillowcase.  So I am going to duck up to somewhere around 1830, where you start getting figures again.  And, happily, I do have a source for patterns for that.  And my garments break down thus:
  • Chemise, which is more like a camisole than chemises as we medievalists know 'em.  Should be trimmed with lace &c., but that could be eschewed.
  • Drawers.  Can be skipped.  fnarr fnarr.
  • Corset.  This...will be another load of Not Fun.  But I wanted to learn this technology anyways; might as well do it when there's a gun to my head.
  • Gown.  Silk, should have some lace or other decoration, but considerably less than those poor sods in 1860-1890.
  • Gloves.   Buying them, believe you me.
  • And, if I have time, HA HA HA HA HA, a reticule.
1820; a little earlier, and a lot of work.
But something not unlike a shape.

1828.  Now we're talking.  The fabric
speaks for itself.

Monday, September 7, 2015

Banner Project I: Mission Accomplished

Working As Designed
After a frenzied amount of work Thursday and Friday evenings, there was no more time to whiten the sepulchre, and so the banner was launched on Saturday morning.  In the photo above, you can see it hanging in front of the vigil tent.  

It bugs me that you can see a tiny bit of the lining hanging down--I wanted to hang it overnight to get the fabric weights worked out, and then tack the lower edge of the lining out of sight.  However, we had a bunch of emergency sewing to do for the ceremony itself, and therefore I downgraded this requirement from "important" to "nice to have", whereupon it fell right off the back of the project truck.

Anyways, the recipient expressed her great happiness with the banner, and that's the important thing.  (You can read her account of the whole day here.  In fact, just read her blog.  You need more 16th century French in your life.)

Lessons learned:

  • Always apply some form of fray-checking.
  • With multi-layer motifs like the daisies, attach the center before basting the outer parts.  Ended up with a lot of pooched daisy petals.
  • ...but still baste before going over the outer edges of a motif.
  • I need to pad my time estimates even more than I have been.  -_-;;;;
  • It's as helpful to have an embroidery frame for something this scale as it does for fine work.  (Though, you couldn't use a traditional hoop because it would mark the velvet; so it'd have to be the thing where you baste it to backing fabric and lace THAT to a frame.  What a *$@& pain.)

Next up: making an 1840s ball gown for me, and a Napoleonic-era 95th Rifles uniform for my lovin' man, for a Halloween wedding we are attending.  D:

Thursday, September 3, 2015

Banner Project I: Down To The Wire

All heraldic elements in place, woo.  OKAY SOME ARE PINNED ON STILL SHUT UP
It's been a little while since I've joined you, Gentle Readers, because I've been on the hop.  I went away for the weekend for an Intense Sewing Experience...which yes, happened to be at the beach...but I'm happy to say that much work was done; not only on this here project, but other elements of this coming weekend's festivities.

I had a slight setback when I sewed the first daisy on, discovering that it doesn't matter how tidy and fine your blanket stitch is, it's not going to stand up to the fraying power of poly-cotton brocade, let alone a thick pile cotton velvet.  So, I had to stop production and prepare strange unguents which I then brushed along every. edge. of. every. daisy. and daisy. center. with the tip of my finger; and then set them all to dry.

Meantime, I worked on the needle.  I cut it out of a really lovely blue silk taffeta, but wanted it to have a bit more dimensionality, so padded it with two layers of a fairly close blue linen (cut off an old dress I'm never going to remake) (and the skirt of which is going to be the banner backing, thank you).  I couched silver cord around it and then--I'm rather smug about this--used a thick twist of embroidery floss as the "thread" inside the needle.  
There's still a little trimming to do, too.

The main challenge here was trying to get it all to lie flat, while simultaneously having to bunch the work up so I could actually reach the part I was sewing (naturally right at the middle of the piece).  A big-ass frame would have helped a lot here.  The result is that the silk is visibly pooched in places, which does not delight me.

Artistically, I think it would have looked better to have the needle lying at the same angle as the bend; but that's not what the heraldry says, so there you go.  Take the lesson when registering your arms, people.

Once that was complete, the daisies were dry and I started stitching them down.  This was mostly just a tacking job to keep the petals from curling around, because a) the stitching of the daisy centers would be more than enough to keep the flower itself in place, and b) ideally I will go back and either blanket-stitch or couch a shiny around the petals.  This is the point at which I also realized I had somehow failed to fray-check two of the daisies.  -_-;;;  I left those for the moment, not having more Elmer's unguents to hand, and continued on with the daisy centers.

SHINY i like the shiny
These are, as previously noted, cut out of a tawny gold-colored velvet that is a veteran of another banner.  I couched around the edge of each one with a doubled gold cord, for a bit of that extra sparkly richness.  As of last night, I had completed about half of them; the rest I can do tonight, and that leaves tomorrow (before leaving for the three-hour drive, wah) to attach the banner backing and create the pole pocket.  I'm calling that Minimum Viable Product.

Once the fun is over, I'll take the thing back, do a proper job on the daisy petals, and get a nice cord to attach along the sides of the banner.

Then I can start on the big project that's due by Halloween.  ora pro me