Sunday, December 11, 2016

A Little Pourpoint, A Few Museums

ahem

Following the head-clearing of the most recent post, I hitched up my belt and decided to just start somewhere; this is the test piece after all, and if it's not perfect, that's okay.  And since I am pretty clear on what's going on with the body pieces at least, that seemed like a good place to start.  


Marking the quilting lines on the
LB piece
I laid out my base linen and transferred the body pattern pieces[1] (left front, right front, upper back, lower back) onto it, incorporating the various notes and adjustments[2] from the muslin; a process that, once again, makes me long for a) a large table, b) a light-box, and/or at the very least c) pattern weights.  Then I moved it to the ironing board[3] and, just for the first piece I'm going to work (the lower back, which is the least significant piece) marked the seam allowance & quilting lines there.  Now, Gold Charlie's quilting lines are 3.4cm apart; this is about 1 inches.  My gridded ruler doesn't do thirds, so I started with 1¼; that looked too narrow, so I went up to 1½. Once that was done, I got the whole linen length onto the frame.

if you think these lines look cock-
eyed, you are entirely correct
With some labor, I got the whole thing under good tension, and then looking at the LB piece I saw that the lines were quite uneven, in spite of using a gridded ruler to mark the center line (which instead wandered off to something more like Manhattan-north) and all my other careful efforts.  Grumble.  So, spent some time redoing that.  Then I cut out the fashion-fabric linen for the lower back.  This was the end of the evening on a Saturday, so I figured as how to leave it set up; get to bowing cotton on Sunday; and hopefully be able to quilt a bit several evenings of the week.

Unfortunately I did not take lessons from my wiser and more experienced friends; and I woke up to an Earth-Shattering Kaboom and learned that although this cat hammock could take one cat, it couldn't take both of them.


AHEM
I lost my momentum at this point and put the whole thing aside for several days.  About the time I was ready to buckle down again, I cleverly fell down our building's stairs and committed various indignities to my shoulder and wrists, which made bow operation impossible for several more days.  And now we're into the pre-holiday whirl.  Argh.  

That said, I did get some medieval head-feeding going on!  I went up to my sister's outside Boston for Thanksgiving, and she thoughtfully provided for my entertainment with a trip to the Peabody-Essex Museum, an institution I had been entirely unfamiliar with.  They are notable for having one of the best collections of Asian art in the US (including an entire Chinese house); but our trip was for an exhibition on shoes, put together by the V&A, with some local additions--the Peabody Essex also has a huge shoe collection (who knew?).  So I would have enjoyed the heck out of it to begin with; but imagine my surprise and delight to find some period shoon I hadn't seen before:


14th-century poulaine. That is one narrow-looking
sole if you ask me
Tudor shoe.  Note the nice big toe box. No bunions
for these guys.
And then, the weekend following, we went down to Baltimore to the Walters Art Museum, another institution I had been entirely unfamiliar with (do you sense a pattern?).  This trip was triggered in an unusual, possibly unique, manner; when we were at the V&A in October, a whole bunch of cases in their medieval rooms had little "sorry!" notes to state that this or that piece had been lent to the Walters for their "A Feast for the Senses" exhibition.  By the sixth or seventh of these, we looked at each other and said "well OK, I guess we're going to Baltimore"; and so we got us up a convoy and did so.  It develops that the Walters has one of the best medieval collections in the US (how the hell did I not know this?!), so even without the special exhibition it would have been entirely worth the trip.  But! The special exhibition is exceedingly well done, and I heartily recommend it to your attention, if you can fit it into your holiday schedule (it closes Jan. 8).  No photos, naturally, but the exhibition catalogue is nice.


[1] Does the fabric grain cease to matter (in a structural sense) in a case like this, because of all the padding & quilting holding everything in alignment?

[2] Marking on the ironing board was a horrible choice for a host of reasons, including "squishy board cover", "not being able to have the whole piece flat at the same time", and "insufficient light".  I should have done it on the floor, or possibly once the piece was stretched on the frame (which is where I ended up re-doing it).

[3] NB: I did not make any changes in the pattern pieces to account for the quilting.  On the test swatch, there was no difference side-to-side, and less than a half-inch top-to-bottom; and I expect to quilt the piece less fully than the swatch.  Let's see what happens!

Sunday, November 20, 2016

The Pourpoint Commission: A Little Lost In The Woods

Current mood:

This didn't help either.
In spite of last weekend's delightful surprise and concomitant confidence-building, it must be admitted that I haven't exactly been tearing out of the gate on this project subsequently.  A good part of this is due to post-election emotions, a combination of "what does it all matter" +  compulsion for immersive escapism[1] which I've found exceedingly difficult to overcome.  But even setting that aside, the problem is that I can't see my path clearly, and that's stopping me from even starting the parts I do have a plan for.  So, let me try and lay it all out.

I have established that the pieces much be stretched for quilting, or the quilting won't work. -> It is known that Red Charlie was done this by stretching the base fabric on a frame, and then putting the padding and then the fashion fabric on top, and quilting 'em all together. -> Logically, since the same guild would make Red Charlie and Gold Charlie, they'd do the same technique.  (And also, I can't figure out any other way to do it given the original postulate.)

Points of question:

  • This is somewhat wasteful of the base fabric, as you have to have enough unused space around the edge to attach it to the frame. Is that cricket?
    • I think that's OK for this project because it's a rich guy's garment and if he's affording silk damask he doesn't have to give a tinker's dam about a few scraps of linen--but it opens the question of, how did they do the common soldier's aketon?  He can't afford it.  What's the process for him?  And what am I missing by not knowing it?
  • Stupid minor nit: what is the best analogue for period silk sewing thread?  I used silk buttonhole twist for quilting the swatch, and it worked well, but is it right?  Even St. Janet didn't specify anything other than "silk thread".
  • How does one actually do the assembly?  My assumption is:
      1. Draw the pattern pieces onto the base fabric
      2. Stretch base fabric on frame
      3. Cut out the pattern pieces in the fashion fabric
      4. For each piece, put a bunch of tow on top of it, and then the fashion fabric on top of that
      5. ??? Stitch?
      6. Profit! 
    • But I'm not sure if one ought sew around the edges (say, just inside the seam allowance) to make a "pillow" like I did for the swatch, or just quilt away, and what the ramifications are in either case.
  • And even then, how the heck do you pad the sleeves?  
    • We know[3] they're assembled pre-quilting, so it can't be approached like the above method.
    • So. You have to quilt a piece shaped roughly like a giant wedge of cake.  How?
      • Embroidery Option #1: Lace it into a slate frame.  
        • I'm pretty sure this won't work because the piece is too heavy.
      • Embroidery Option #2: Tack it to a larger piece of fabric and stretch that to your frame.
        • Non-starter; it would mean there's another piece of fabric on the sleeves, and there isn't.
      • Quilt it without stretching it.
        • I have pretty conclusively shown why that doesn't work (unless there's some magic-bullet technique I wot not of).
      • Build a blanket fort and snivel in confusion.  <--- YOU ARE HERE
      • The only thing I can think of is to do it on a very small frame and moving the work section frequently; but I foresee challenges in trying to tack down the parts that are already padded.  I'm not sure it will work at all.  But this is the least worst option I have come up with.
It's funny; I used to merrily plunge into things with no clue of what I was doing and deal with problems as they appeared; and after long and painful experience (both at work and personally) I finally learned to plan everything out, gather my information, line it all up, and then proceed.  So of course, now I have to un-learn all of that, and remember how to be careless again.  Wait, what?

This is the best photo of Gold
Charlie's inside that I could find

[1] I've been replaying Skyrim.  Because getting chewed on by giant bears and hacked up by deadites[2] seems like a more promising environment.  At least they *have* an environment, which we soon won't.

[2] and at least I can shoot the bad guys with my trusty bow; not a winning strategy for real life.

[3] Do we know this for certain sure?  The quilting lines really, really look like it, and it would be the natural conclusion from looking at them.  But the inside construction has never been truly studied, AFAIK; and if you've eliminated the impossible--

Monday, November 14, 2016

So, This Happened.

*kermitflail*

Warning: SCA inside baseball ahoy

Saturday, after a lively and interesting arts & sciences competition[1], we settled in for a long winter's nap court, a game which I expected to have exactly zero skin in.  Imagine my surprise when I got called up before the Queen and inducted into the Order of the Maunche, which is Kind Of A Big Deal.  I will not swear that I wasn't a bit teary-eyed, but I firmly deny bawling my eyes out in the back afterwards, even if someone managed to get it on film.  It's obviously Photoshopped.

(Yeah, I have two medallions!  One is a tiny goldwork pin Beth made for me, having taken note of my muttering about how, meaning no disrespect to storied traditions, having a big ol' device worn as a pendant is super not-period for practically anywhere in medieval Europe {particularly when you have several of them jangling around your neck); the other is an Ancient & Honorable old-school medallion of our family and I shall wear it with pride when I'm not gussied up in spite of those mutterings.) 

What now?  Well, much as with marriage with someone you've already been living with for years, both nothing has changed and everything has.  I'm not going to stop doing what I'm doing; it does not change my project list (or my angst about it) one iota.  But there's a reason that thar scroll says "...and responsibilities therein attendant".  The tangible and obvious one is to make recommendations to the monarchs regarding other candidates, but that unpacks to some serious activity: seeking out the work of artisans I don't know, paying attention to the ones I do know, helping, guiding, advising, and in all ways working to support and further the arts.  This is not a small thing, particularly as it runs counter to my preferred state of existence, namely "melting into the background".  HELLO PERSONAL GROWTH  


[1] I didn't win anything, but I didn't particularly expect to; it's not as if I had a finished piece or anything, just a work in progress.  What I did have is lots of good conversations.

Sunday, November 6, 2016

The Pourpoint Commission: Getting Down To Brass Tacks

FOR REALSIES
i have been waiting so very long to use this joke

I spent some time yesterday morning wandering through the retail wonderland around the country estate looking for proper-sized embroidery frames to use for the $@&! swatch, and came up empty.  (Michaels did have a small version of the Muckin' Big Quilting Frame, but I figured the snap-on PVC bits were not going to be super-successful with the thickness of padding I have {since I didn't leave enough border around the padded center to clamp it down just on that}.)  Whereat the beloved redhead pointed out that, if all I needed was wood assembled in a square shape, we could easily get wood and nails at Home Depot and bang it together in his garage.


Today, on Blue Peter...
Well OK then.  $11 later, we had four wood bits cut to roughly 8" length; a packet of nails; a packet of sandpaper; and a bunch of, yes, brass tacks.  It wasn't quite as simple as that--the nails started to split the wood, because it's cheap-ass crap, so we had to drill the nail holes; but within about half-an-hour I had a Functional Square Thingy with the rough bits sanded down so as not to catch on the swatch (unlikely) or me (very likely).  It is not pretty and it is not even and it will win no prizes, but it was fast and cheap and sufficient for the work before me. I had a little bit of worry that I wouldn't be able to get the tacks into & out of the wood--there is a special doover that the embroidery peeps use for this purpose--but a) I have a hammer and b) this is why I bought the packet of 200 tacks.

I got it home and started futzing with it, and somewhat to my surprise, it wasn't too tricky to get the piece stretched on the frame.  For the most part, I could just push the tacks in with a reasonable amount of force, though there were a couple places where they just would not, but banging on them with the nearest rock sufficed.  I started with the tacks spaced about 1.5"-2" apart, but I was still getting some play, so there's now one tack per inch on each side.  And now, the quilting.

An hour of solid work. *sob*
Fun fact: even with the linen stretched mightily across the frame, the cotton tow is still thick and loose enough that even if you stab your needle straight through the piece, there's a lot of airspace inside for it to come out somewhere...else.  Dramatically else, in fact.  So, I'm having to stab the needle down on its marking line on the top (which is actually the bottom, never mind[1]), flip the frame over, make sure the exit point is in line on that side, pull the stitch tight, and do the same thing in reverse.  For every single stitch.  This is...not fast.  But it is working.  And, on a positive note, I am not having any problem at all getting the needle through the layers, so hooray for bowing the cotton.  And I'm getting an average of 6 stitches per inch, which is still pretty kindergarten-level as quilting goes, but meets Minimum Viable Product.

I'm not anticipating moving the work forward today much, since my dashing consort and I celebrate three years of togetherness on this day[2] and we intend to go out to the Botanic Gardens and then come home and make a full Sunday dinner in our new celebratorily-purchased Le Creuset roasting pan[3], but at current rate of progress I am tolerably confident I can still finish this in good time. If the world doesn't end Tuesday night, anyways.

Also, I bloody hate Daylight Savings; or at least, not specifically being in GMT -0400 vs -0500, but changing the clocks abruptly.  It completely messes with my internal time sense (which is why it's 8am on a bloody Sunday and I've already had coffee, apple crisp, and a full blog post) and it also makes my cycle commute a ton more dangerous.  MAKE IT STOP.

[1] I have it upside-down on the frame (i.e., lining on top) because that's where I marked the chalk lines to quilt along (in sad and uneven fashion; see previous post's footnote about marking these before you stuff the piece, you numpty).
[2] The date is actually tomorrow, but it's a work day and we're going with a bunch of people to see Doctor Strange, so.
[3] yes, we are some goddamn party animals around here


Thursday, November 3, 2016

The Pourpoint Commission: Two Steps Forward, You'll Never Believe What Happens Next

I AM DOING CRAZY THINGS AND
MAKING A GIANT MESS WOOOOO


The last several days have been something of a roller-coaster ride. As previously alluded-to, on Sunday I was kindly lent a bow by a fellow artisan, and had a go at bowing cotton. What, you may well ask, is bowing cotton? It's exactly what it sounds like; but to answer the actual question, what you're doing here is taking the cleaned but still very clumpy raw cotton and breaking up the fibers; it is kiiiiind of like combing or carding wool, except that part of those processes is also geared towards aligning fibers to make yarn, and we are not doing that here; the sole object is to make the cotton evenly foofy and no longer clumpy. Why twanging the fiber against a bowstring is a great way to do this, and who thought of it first as a clearly obvious solution, are matters of complete opacity to me.

But it sure as heck works. 


Two portions of cotton, each 30g, pre- and post-bowing.
...Eventually. For the first half-hour or so, I was just sort of holding the bow casually at waist height and kind of twanging a little bit; this was working slightly, but very slowly and ineffectually, and I was getting a blister on my thumb from holding it strangely.  As well, the bow was strung upside down (this is a bow where that matters).  Once we re-strung it, over my protests of "it's fine really I am sure it doesn't matter", and I held it like an actual bow (as seen, in, ya know, the video I was attempting to follow), suddenly it started working like gangbusters; thus leading to the immortal battle-cry of "Things work SO MUCH BETTER when you do them right!!"   I think I need to have that translated and use it as my motto.   But, in any case, after about three hours I had a mighty chunk of bowed cotton, where "mighty" equates to 30 grams.[1]  (This was not an arbitrary number; I had calculated that as the weight of cotton batting I'd used in the first swatch.)  

I still thought it best to baste the border around my swatch so that the cotton would not come oozing out, so I did that thing[2], and then figured to lace it into my Big-Ass Quilting Frame™ as you would into a slate frame.  That was a glorious plan, oh yes it was.

The ultimate visual representation of *sad trombone*

Physics was clearly not on my side here and I realized I was going to need a different solution. My first kludge was to try sticking it in my biggest embroidery hoop, but the stuffing proved way too thick for that. The next fallback option is to get a frame of a more reasonable size. Well, I had meant to get one for embroidery projects anyways...but this is not the kind of thing you can usually rock up to your corner store and grab, or even get on Amazon; and I have blithered away far more time than I can comfortably spare already; I really need to be cracking on this. I have a couple irons in the fire and hope to have some kind of solution by Sunday, but AAAAAAAA.

Even putting the swatch aside, this has caused me to have some deep and uffish thought about how to do the actual bloody garment. I'm used to making garments in what I guess you'd call a piecework kind of way: cut out the pieces, make up the pieces (for however much or little that calls for), join the pieces. The more I chew it over, the more I'm thinking that's not how you can approach this work; I think it has to be done in the same way as the "3-D shapes on a flat ground" method, where the lining/base layer is stretched on a frame and the padding & fashion fabric are built on top of it. (Of course, less engineered than that technique, so simpler. Yay? I think?) I don't see any other way to make it work. If any of my illustrious readers has insight here, I shall be eternally grateful. And will bow lots of cotton for you.


[1] Also some quite sore shoulder and arm muscles that would be much worse the next day.  If only this was an easy motion to do with the off-hand as well, it could be a great workout--and it would produce something useful for your time, which is the core problem with a lot of exercise routines.
[2] Another Learning Experience: draw the quilting lines on the fabric before you stuff the piece, you numpty.

Sunday, October 30, 2016

The Pourpoint Commission: The Road Goes Ever On


On this project, I keep thinking "ah! Now as soon as I do this one thing, I'll be ready to start for realsies."  And then I find six more things to sort under that one thing.  This is becoming uncomfortably like my day job.

For some reason, the cotton
fibers stuck immediately to the
green linen, mostly ignoring
the white.  Not important,
but interesting.
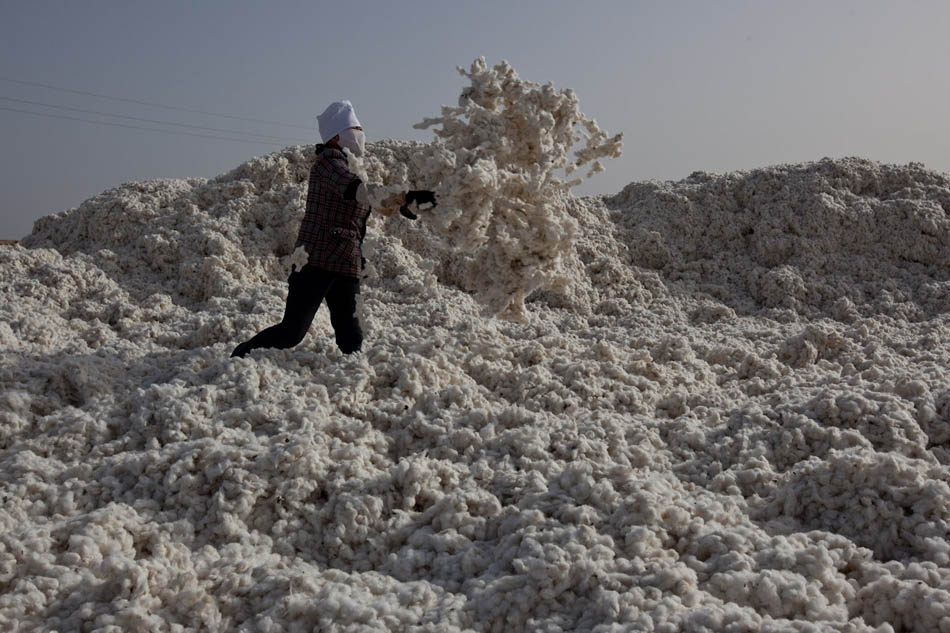
At the start of this past week, I had my new iron, I had my cotton tow (also my spine and my Orange Crush), and I figured we were rollin'.  I cut out two more 10" pieces of the linen and lining, and started pulling cotton out of the Giant Cotton Blob.  I did my best to floof it out (and can I just tell you, I now have a much better understanding of why it's called cotton candy) and then placed it on my swatch, sort of pushing and squidging it to make it look fairly evenly distributed.  It still had some clumps and valleys, as you see, but I didn't think that would be particularly significant.  (Spoilers: I was so very wrong.)  I knew I would need to baste in some fashion, but thought the chief worry was that the cotton would blorp out the sides of the swatch (spoilers: I was so very wrong, at least about that being the chief worry), so I basted a half-inch around the outside, making a kind of pillow-like entity.  At this point, I paused to weigh the piece, and went back and weighed the one I did with cotton batting[1]--there is .25 oz difference, for the record, which doesn't seem like much but is about a baseball-sized chunk of unfloofed raw cotton[2].  So it wasn't going to be the best comparison, but this would turn out to be the least of my problems.

It's a nice wee pillow. The
cats thought so too.
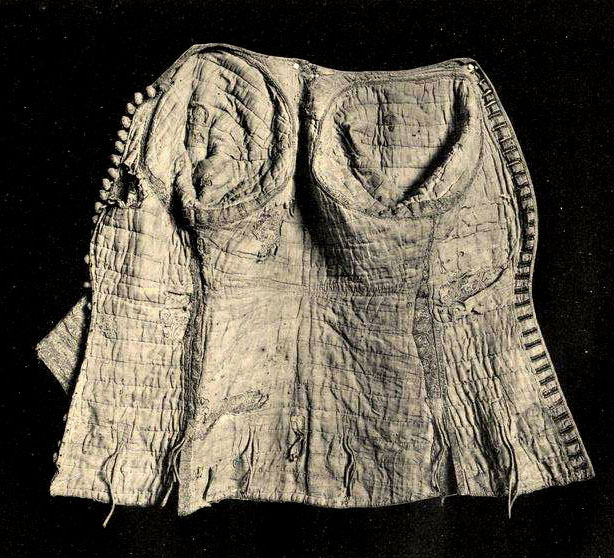
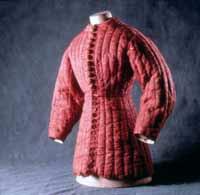
I took my quilting between in hand, threaded with some heavy linen thread I had hanging around, and started in.  Within three stitches I knew this was not going to work; the linen thread's way too heavy and coarse for this work.  Ctrl-Z!  The Black Prince's jupon was quilted in silk thread, so OK.  I dug up some silk twist, threaded that up, and started in.  This was going a little bit better, but I wasn't getting anything near the fineness of stitch I was looking for; Saint Janet doesn't mention the stitches-per-inch in her article, but it looks pretty fine on the photos, and modern quilters advise 6 for newbies, 10 for experts.  I was getting three.  And even those were pretty questionable; it isn't just the thickness of the padding to get through, but every time I hit a clump in the cotton, the needle just wasn't going through.  I tried finer needles, I tried my medieval replica needle (IT BENT. fjdkalfjdaldfj); nothing was improving the situation.

At this point I started whining on the Internets, as one does, and received counsel that instead of quilting by running stitch, I would be better served by stab stitch[3].  So I gave that a whirl, only to find, well, let's let the photos speak for themselves:

Front side: uneven but at
least straight lines


Back side: WAT

Because, see, there's nothing holding the top linen layer and the bottom linen layer in alignment with each other; the more so since there is additional play as a result of the padding; so they are migrating all over the place.  And lo, the light came on of OH THIS IS WHY THEY USED A FRAME IN PERIOD.  

Those medieval guys, ya know. Not stupid. Not stupid at all.

I took further counsel with Our Panel Of Experts and found they're both using the same PVC quilting frame for this purpose, and it breaks down tidily enough that it won't be an undue strain on the limited household Lebensraum, AND I think I can also use it in future for silk-painting banners; so this weekend I went out and got me one as well.  As well, I am kindly being delivered a bow this afternoon to try and bow the cotton, so hopefully I shall also have homogenous padding available by the end of the day.  I just have to think through how best to rig the swatch; probably will have to lace it in like you would for an embroidery piece.  (Another thing I've never actually done!  Yay!)


[1] yes, the smart thing would have been to weigh just the stuffings, but that would have required me to have thought of it before I quilted the first piece.
[2] Based on our kitchen digital scale, which only measures in .25oz increments in the first place, so it's not the best/most accurate measure for this purpose.  But there's a limit to how crazy Imma get here.
[3] For the non-textile peeps: Running stitch is the "normal" sewing stitch, where you push the needle up and down several times along your line before pulling the thread through; it is fast and efficient; the key here is that the needle goes through at an angle, which becomes mucky if your piece is thick.  Stab stitch is where you push the needle vertically down through the piece with one hand, and the other hand is below the piece to send the needle vertically back up.  It is SLOW.  I cannot sufficiently emphasize how slow it is.

Sunday, October 23, 2016

The Pourpoint Commission: Setbacks and Re-Orientation

here's me

With my usual timing, I came down ill last Wednesday and, for the following several days, wasn't up to anything but laying on the couch moaning.  Today I'm much more myself, but of course I am lacking an iron, which is, as project managers say, a blocker.  (Fun fact: you cannot get any iron at all with the "Get it Today!" button on Amazon.)  This will be rectified tomorrow, but I'm more than somewhat annoyed by losing most of a week of work.

On the bright side!  Things that have arrived include my 5lbs of raw cotton, and my ILL of Janet Arnold's article on the Black Prince's jupon!  Which is a downloadable PDF!  I NEVER HAVE TO GIVE IT BACK!  MOO HOO HA HA!

ahem

I haven't un-vacuum-sealed the cotton yet because I don't want to start getting fibers everywhere before I'm ready to address them, but I've torn into the article like a kid on Christmas morning.  Here are our takeaways (with the disclaimers that Saint Janet had to examine the garment through the conservation net, with the possible inaccuracies this introduces):

  • It has a linen lining, cotton wadding for padding, and the silk velvet (linen weft) fashion fabric (already appliquéd, as previously noted).
    • The fleurs-de-lis were done in the "part-of-the-ground-fabric" style of semy, rather than all as complete charges.  On the other hand, the leopards of the English arms were carefully sized for the space available in order to be entirely complete charges. Not relevant to today's project, but interesting to note for future reference.  
    • What is not clear to me is whether the silver label of cadency was just appliquéd on top of the ground devices. Seems like a hell of a waste of goldwork if it was, and a bunch of extra work if it wasn't.
  • As I'd theorized from looking at it, the quilting happened after the layers were assembled.
  • There's fragmentary linen binding around the neckline, with a few remaining thread bits to suggest there was velvet there too (but it's not clear from the article if, like the garment itself, this is the remaining linen warp of the velvet, or whether there was a linen layer and then a velvet layer over top of it).
  • The quilting seems to've been done with silk thread.
  • There was twisted red-and-blue silk cord lain over the seams joining the heraldic quarters.  Quaere: is this purely to ease the visual transition, or would it be something fun to do to ornament any seam?
  • She does talk about Red Charlie and Gold Charlie[1], but not at the comparison level I need, namely on the padding differences.  Though she does kindly include the quilting lines on each of them.
This is all very cool, though for the most part not immediately helpful on the how-to front, but for some reason I feel a greater level of confidence for having it in my pocket.  On the down side, I feel the chances of having the test linen garment done in two weeks are vanishingly small; so I expect my entry may end up being more about explorations on the padding/quilting front.  And that's OK too.


[1] this is how we are officially designating Charles VI's and Charles de Blois' pourpoints respectively.  Please take note for future correspondence.

Sunday, October 16, 2016

The Pourpoint Commission: Padding Your Answers

AAAAAA[3]

For once, I thought, I had a plan and a schedule and everything was going to proceed at a dignified, adulting sort of pace.


ha ha ha no


Operations began well enough; I went to a well-known quilting shop[1] downtown to pick up cotton batting, that being the stuffing substance recommended in the pattern for ordinary mortals; and the next night, I began making up my test swatch.


Here began quandaries.  First, how many layers of batting to use?  On the one hand, there needs to be a palpable amount, otherwise there's no percentage in bothering.  On the other, this is (again) a courtly garment, not military; it doesn't need the functionality of full-on padding; and though you'd want to look butch, you would not want to be so padded to look like the kid from A Christmas Story.  And, of course, the padding's missing from CdB, so we haven't much of a notion of how poofy it really was; and although (as seen in last week's manuscript image) the gentlemen of the time were often illustrated as having some serious chest padding going on, how much of that is artistic license[2]?


Le swatch
I thought I'd get around this problem by putting different amounts in half the swatch and seeing what I thought.  I started with two layers of batting on one side, and three on the other, which I found kinda...flat.  So I unpicked the two-layer side and added two more layers there, so I had a four-layer side and a three-layer side (that's what's in the photo).  And they both had a fair amount of body...but I really wasn't happy.  It was both too thick and too flat.  How can that be a thing?  Dither, dither, dither.


I posted this photo two posts ago but
now it's relevant
And then I started to think (a dangerous pastime).  It is known that they did not use cotton batting for this purpose medievally; I don't even know if they had anything similar to cotton batting.  If you look at the stuffing coming out of the Black Prince's jupon, you can see it more looks like an explosion of compressed cotton balls, or something; which makes sense as it's stuffed with cotton tow (basically, cotton that has been only minimally processed)--it has sure never been flattened and treated into sheets.  Shit gonna behave different, yo.  And yes, this is a military garment (if a fancy one); it may have been made differently than a court garment; but I'm inclined to think that if "this is how we stuff", then the difference is more likely to be in degree rather than in material.  

Naturally, the next question was "how's everyone else doing this?"  I spent an hour or so on the Googles, and based on the appearance of the pourpoints and jupons people are making (with one big exception, ahem), it looks like they've all stuck with cotton batting as well; they all have that flattened-out feel that my swatch does.  So, I could make at least the linen test version with my cotton batting; it's the Current Tech; but the more I thought about doing that, the more unhappy I became, because it just feels wrong.  Wrongity wrong wrong.  I don't want to make more wrong in the world.  And if I make the test garment out of wrong and go to make the real one out of right, then it isn't bloody much of a test garment, is it?  But I hadn't a clue where to get cotton tow; the big exception above was facilitated by a one-time gift of a bunch of it to FIT, which the school didn't want, and was fortuitously regifted by our international conspiracy.


I spent a day or two dithering, panicking, and freaking out on Facebook; thought maybe I could use wool roving or stuffing or something, and ordered a couple of swatches of the latter; contemplated making a surgical strike on Rhinebeck, which is this weekend, to buy vats of dirty sheep product; but was happily directed to a place (ironically, where I'd gotten wool swatches from) that sells raw cotton fiber by the sack.  Well OK then!  And 2nd-day delivery!  So that should show up at work tomorrow or the next day, and although I don't know I'll be ready to fit the client next Saturday (not even just the body pieces), I will be in a better position to make a better piece.


And then my iron melted.


[1] which is, very sadly, going out of business.  Go quickly and get some truly wonderful cotton prints.  I have 3.5 yds of a print of the ceiling of Grand Central Terminal, thank you very much. 

[2] I'm having some mental go-rounds on that same question regarding women's dresses and boob support.
[3] I found that image in a random Googling, and it's from the blog of a guy studying cotton production in China.  I feel like we all ought to go read it at some point. 

Sunday, October 9, 2016

The Pourpoint Commission: Getting The Show On The Road

Arthur and his knights (round table? see?)
wearing pourpoints.  I am slightly weirded
by Sir Eyes On My Tunic in the lower left.
BNF 343, 1380s.
I have previously alluded (for, like, the last several months) to a commission I have accepted, to make a pourpoint.  Here's where we actually talk about that shiznit.

For those of you coming in cold, a pourpoint is a men's garment of the mid-to-late 14th century. It developed from the padded tunic worn under armor; and as often happens, a military necessity created a fashion among men who wished to be seen as Manly Men.  The pourpoint is similar to the cote-hardie in that it's tightly-fitting (at least, in comparison to the fashions that preceded it) and short (often barely covering the rump), but it's padded/quilted, and the images you see in manuscripts make the gents look like pouter pigeons.  To make things a little more complicated, you could also have a padded martial garment of this general mode worn over your armor that was of expensive materials (this is where the Black Prince's jupon comes in; it is silk velvet with metal thread embroidery).  But, this particular commission is for a courtly, fashionable, not-worn-anywhere-near-armor pourpoint.

Charles de Blois'
pourpoint
Charles VI's pourpoint
There are two extant pourpoints kicking around; one that belonged to Charles de Blois, duke of Brittany (d. 1364) that lives in the Musée des Tissus in Lyon, and one attributed to Charles VI, king of France, that lives in the Musée des Beaux-Arts in Chartres (which is child-sized, so is figured to date between 1370 and 1380).  These are both of costly silk lined with linen, and are similar in patterning.  Charles VI's garment is padded & quilted to hell and back; Charles de Blois' is not currently but looks like it may once have been.  

How do we (I) know this stuff? Happily for my sanity, I can once again stand on the shoulders of giants: Tasha Kelly of La Cotte Simple has studied the bejezus out of pourpoints and generously makes her findings available, including publishing a pattern for Charles de Blois' pourpoint.  So I picked that up first-off, and (after measuring my patron & establishing his general parameters) cut out a muslin that I fit at Pennsic.  I actually only cut out one arm to fit...and it was dumb of me, in retrospect, to do the left arm on a right-handed fighter.  But the subject seems reasonably proportionate, so I think we'll be OK.


Fitting the muslin (in
field conditions and 90deg
heat)
Although the actual commission is for a silk garment, I am not so foolish for lack of sense as to go merrily sailing in at flank speed when I've never done a padded or quilted item before.  Especially when the patron has purchased Sartor silk for it AFJDKLSJFKLDFJDF NO PRESSURE NOPE NOPE.  So, I am making a linen version first.  It'll be identical in all other respects, just made out of base(r) materials.  (This will also give me a ridiculous amount of practice on the goddamn buttons.)  I had been figuring on using cotton batting for both verisons, because it's easy to come by, but it looks as if you can get 100% wool batting more easily than I thought.  For a price, of course.  Hmm.  (Quaere: is modern wool batting going to be anything like what they used in period, anyways?)

The current milestones:
- Sat, Oct 22 (Winter Wolf event): Have the main body pieces quilted and basted together for fitting.  Hopefully at least one sleeve as well.
- Sat, Nov 12 (St. Elegius event): Linen version done, entered into the A&S competition.  This means also documentation written up, hey ho.

Presumably by that point I will also know whether I need to make adjustments before starting the Real Item; and I'll then plan out the rest of the work.  The patron has not expressed a desired delivery date, but I do not want to drag out the work, so I'll aim to have it done by Twelfth Night at the outside.

My immediate next steps are:

  • Wash the dark green linen I'm using for the test version
  • Unpick the muslin, iron it, incorporate with notations into a new pattern
  • Pick one of my various linens to use as its lining (at least they're all washed already)
  • Iron & cut out both linen layers
  • Get cotton batting
  • GET MOVIN' YO.


Thursday, October 6, 2016

London Arts Pilgrimage: There Were Some Embroideries

YAAAAASSSSS
As I mentioned previously, there's this little exhibit on at the V&A, and we put on our scallop shells and filled our scrips with travel rations and fared forth to see it.  If at all you can go, you should; and if you can't, you should still order the exhibition catalogue, which is entirely the bomb.  (Let me note, however, that the current sorry state of the pound sterling means that the catalogue is $45 if you buy it at the museum bookstore, and $75 if you get it from Amazon.  So if you go in person, you are SAVING MONEY.  Who loves you and is watching out for your well-being?  That's right.)

Anyways.


So yes, as anticipated, photography was strictly verboten.  The exhibition catalogue is almost good enough that it's OK, but I snuck the above photo of the Black Prince's jupon anyways, because it is THE BLACK PRINCE'S JUPON and I was never going to be that close to it again.  Regrettably, even with my nose pressed against the glass like a Dickensian street urchin outside a pudding shop, the net they've put over the garment to preserve it keeps you from seeing any additional construction detail...and it's so worn away there's not a lot left to see...but it was still a Religious Moment for me.  Fun fact: they clearly spent all this time and expense doing metal-work appliqué onto velvet...and then just ran the quilting channels right the hell over it.  Well OK then.


Wool intarsia seal bag with
embroidered border, c. 1280.
Westminster Abbey, WAM 1494
There are about 80 objects in the exhibition altogether, and a lot of them are the Greatest Hits of Religious Garments you'd expect, like the Syon Cope (which the light in its case wasn't working the day we went, heck of a job there, Brownie) and the Butler-Bowdon cope; but they did a great job rounding up what few surviving secular and semi-secular articles were out there.  So not only did I get to drool on the jupon, I also got to get real up-close and personal with the Cluny's horse trappings (and not just the usual big piece with the leopards of England on them, but some smaller scraps that still have their pearled bits intact!) and a royal seal bag that's of particular interest because it's wool appliqué with no metal-work, which is something we know existed but very little has survived (the Tristan Hanging is one, though it's onlaid rather than inlaid like this little guy) and a fascinating little heraldic number, now in the form of a burse (a case for carrying a cloth used in the Mass), showing a shield with the arms of Stafford impaled with the Woodstock differenced version of the royal arms (so it had something to do with the marriage of Edmund, Earl of Stafford, with Anne Plantagenet in 1398)--but what it was cut down from is entirely unclear.  The exhibition people think it's from a banner, but my reading this summer suggests that you never saw arms on a shield shape used on banners, so my money's on some kind of domestic textile.

Other Moments:
  • Beth's contention that half our problems recreating these works are because we can't get the fineness/tightness of linen that the originals were created on
    • likewise, silk twill, Y U NO
  • Unexpected couched-and-laidwork on the Clare Chasuble
  • Crawling on the floor in front of the Syon Cope to look at the stitchery around the hem in the reflected light from the video playing across the room
  • Being blinded by the 100% intact cloth-of-gold of the Fishmongers' Pall
  • PEARLS ON THINGS
  • Seeing the strong repetition of motifs; not just "it's a cope and it's gotta have the Annunciation on it and that means a lily in a pot", but the almost carbon-copy design details across the board
  • The interlace patterns on the Hólar Vestments, which really need to be turned into trim
And then there was everything else we looked at. Even after cherry-picking all their special stuff for the exhibition, the V&A has a ridiculous amount of textiles; and we spent some quality time in the Museum of London and the National Gallery too.  (And Buckingham Palace, but that was about QE2's Wardrobe Unlock'd, not QE1.)  I haven't started processing the photos with any seriousness yet, but here are a couple of teasers:
TIL tablet-woven edges are still
around in Elizabethan sweet-bags

Elizabethan blackwork handkerchief.
They must've had some serious
colds, is all I can say.


Silk fragment, Byzantine, 900-1100.
Shows noticeable design similarities
to Chinese-produced textiles


Sunday, September 18, 2016

Holding Pattern

You are ^^ here

I haven't done much in the past month: combination of Pennsic burnout, work fried-ness, getting sick, and overwhelming list of Other Stuff to Address.  (Not least of which is going to three events in three weekends; yeargh.)   I've finished some mending, I've gotten a little further with the $*@& padstitching for the kirtle in progress, I've luceted some points for my consort's linen suit (which I'm not terribly happy with and I think I will fingerloop the next batch; but they'll keep his pants up), and in about two hours I'll be going to Fort Tryon Park and, in partnership with another lady, teaching fingerloop braiding to an unknown but potentially vast number of civilians.   

Much of the recent energy expenditure has been on prep work for leading a pilgrimage to see All The Medieval Embroideries Ever.  I hope to have much to report upon my return, though I expect that (as with most museum special exhibitions) cameras won't be allowed, so don't get your hopes too high.  They better have a bitchin' exhibition catalogue, that's all I have to say.

I did have some lovely conversation last weekend with the doyen of early modern men's clothing, which has helped me understand a bunch of things that were whirling in my tiny skull, and when I finally clear the decks to make my consort's next suit I think it'll be ever so much better as a result.  

Next weekend shall be a long schlep but of much rejoicing; our dear friend and colleague will be holding a panel for Expert guild ranking in couching & laidwork.  If you think of this a dissertation defense, you would not be wholly wrong; so we are rallying around to provide support and also snacks.  

I'm looking forward to October.  Nothing on the calendar (...yet...), work should be calmed down; I have high hopes of actually getting some projects seriously advanced.